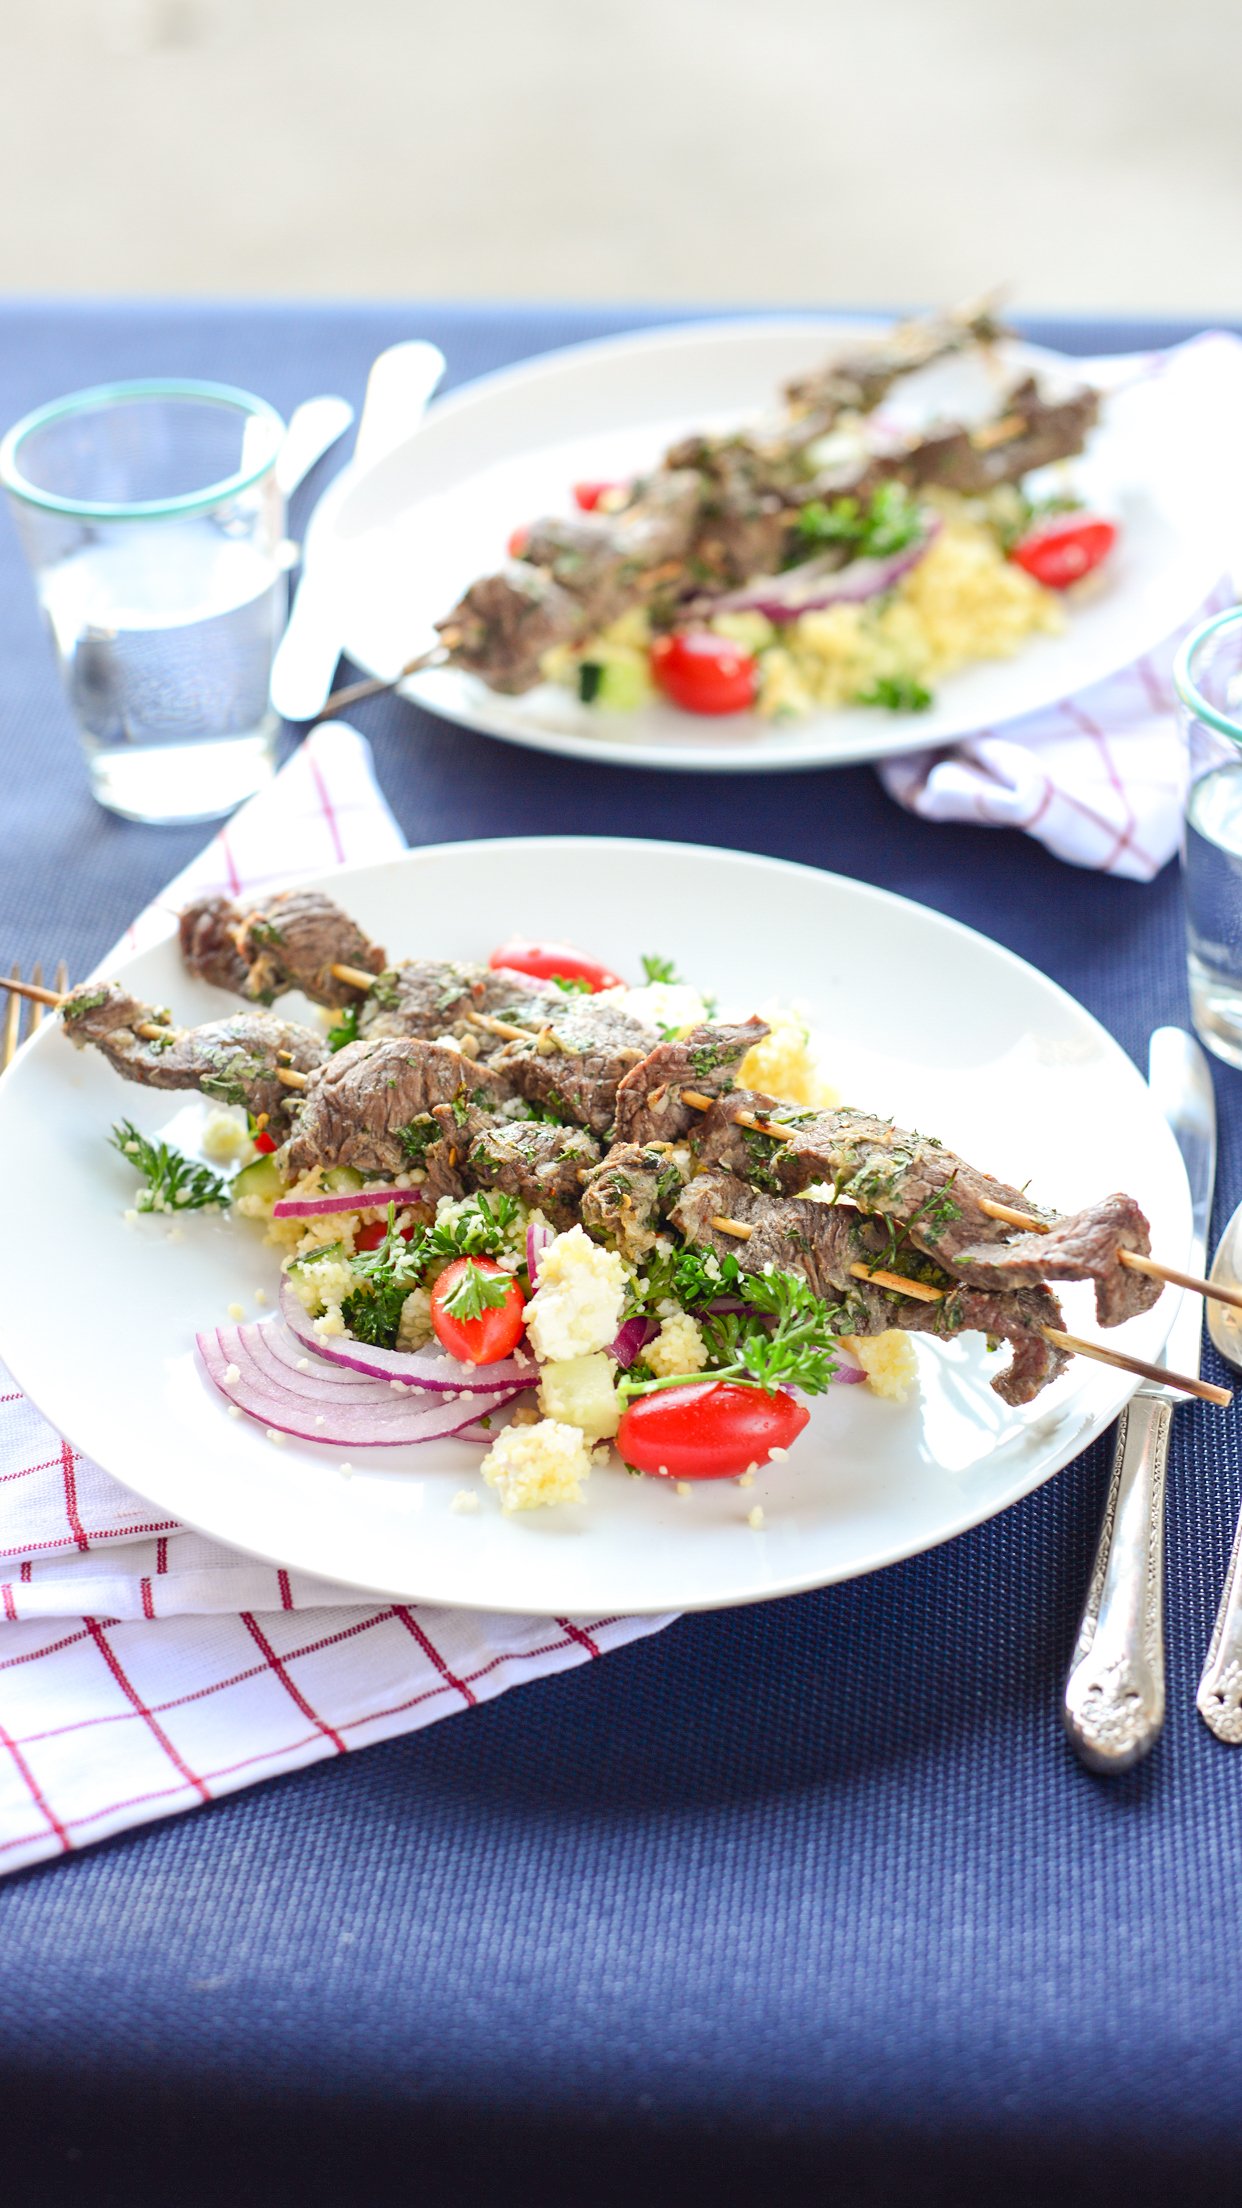
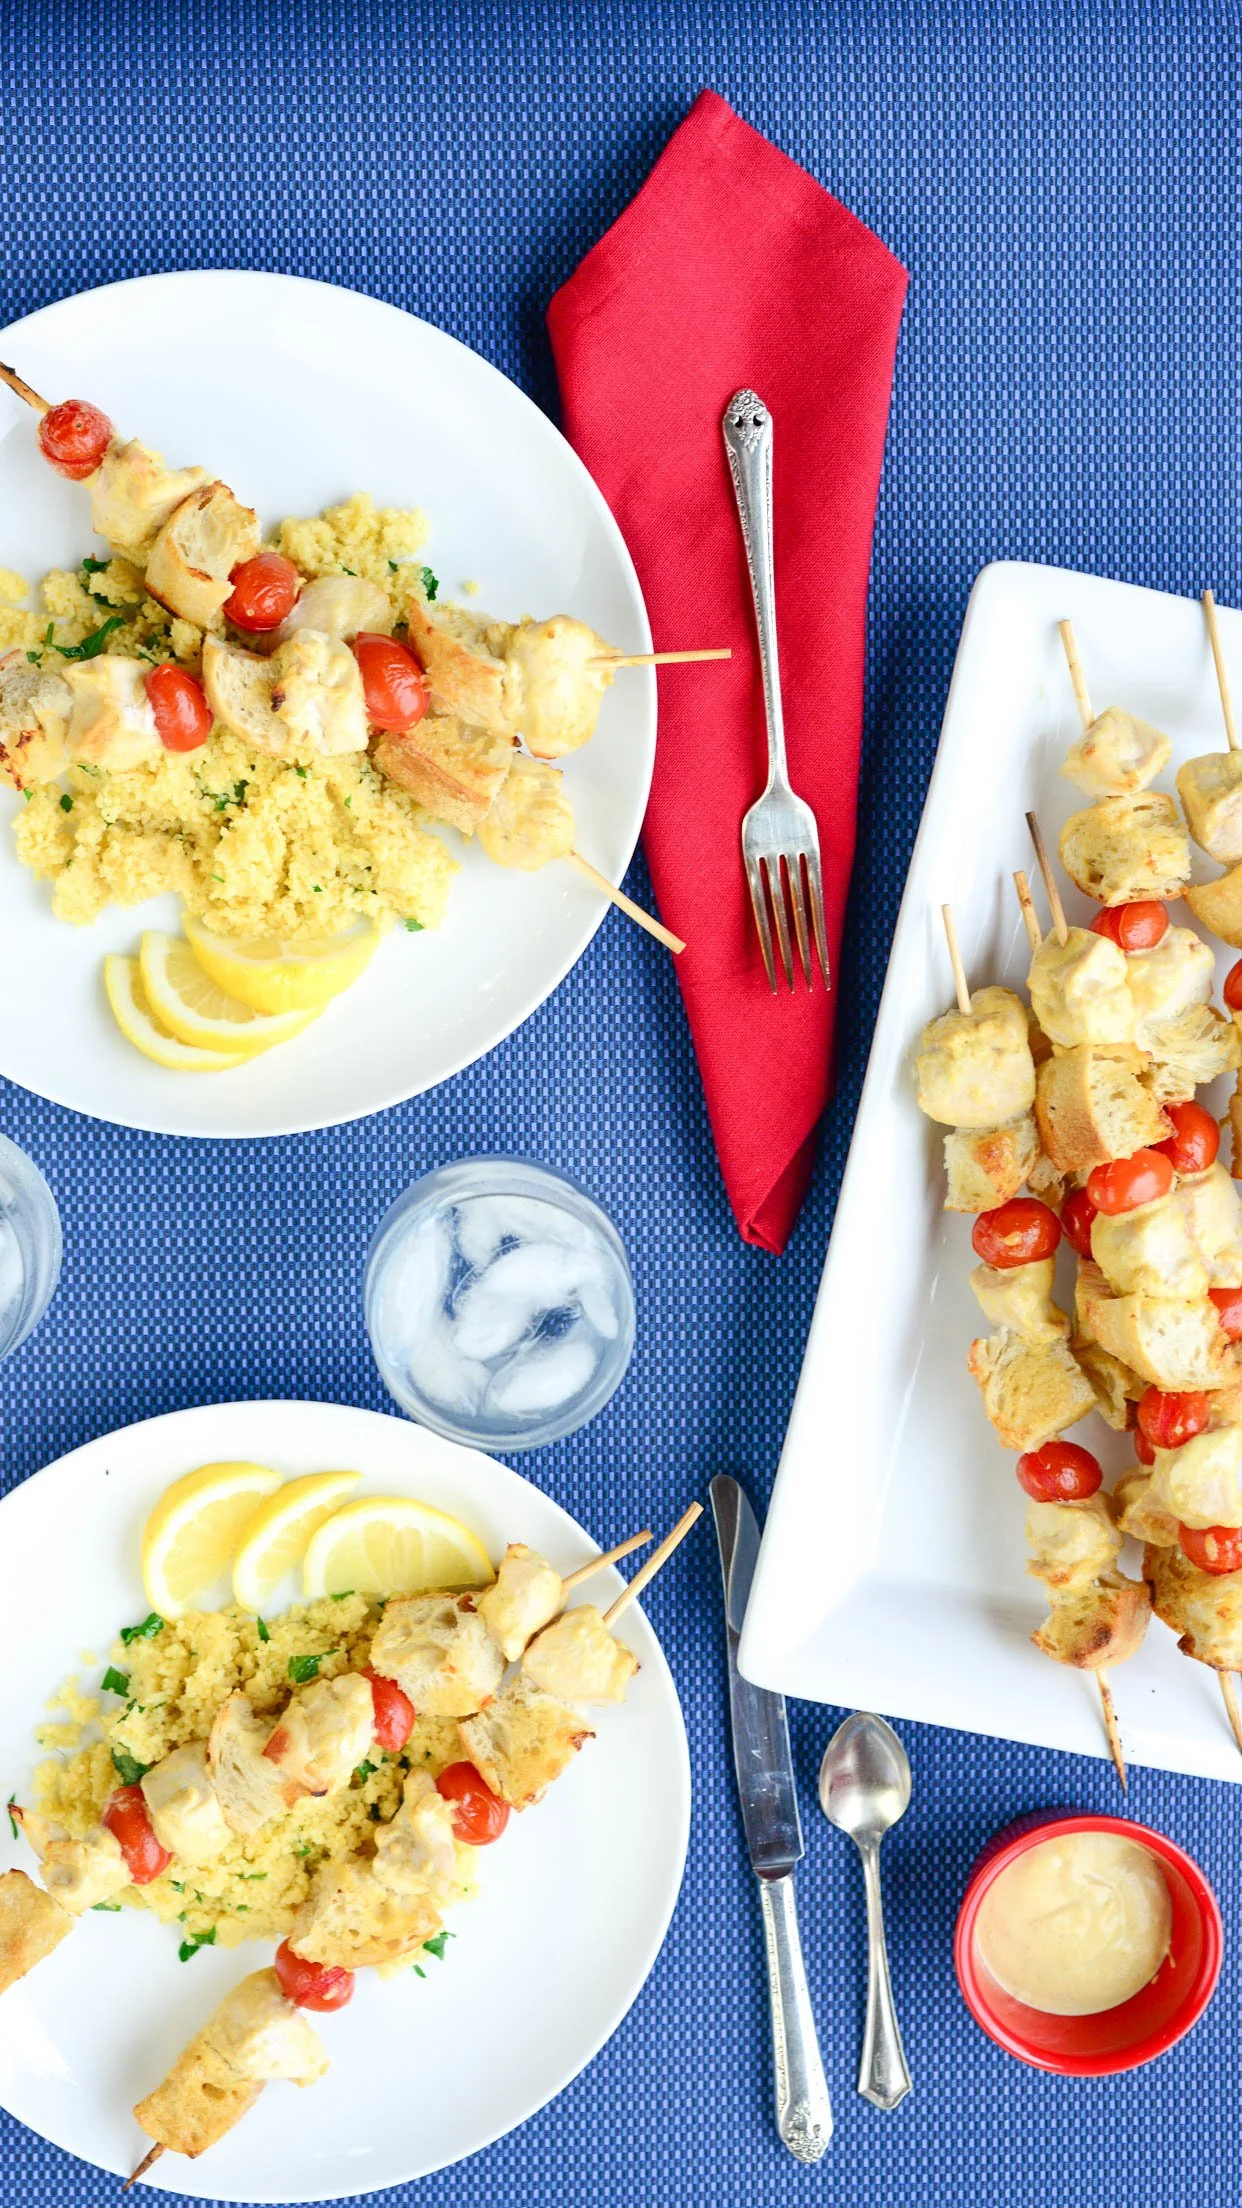
Mustard Chicken Kabobs
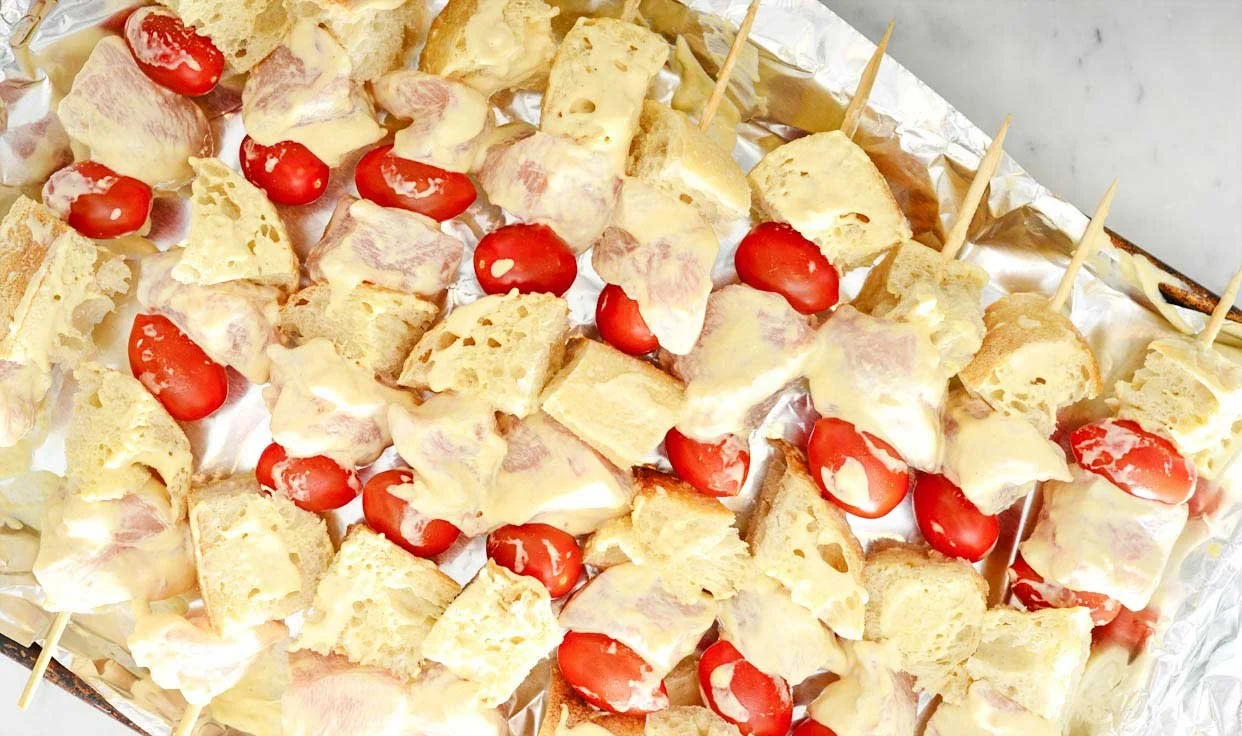
I used to make these all the time and I published them on Weeknight Society. This weekend I had a little chicken - not quite enough to make an entire dinner for all of the kids that ended up at my house - so I had to make do. I remembered these skewers. Because there is bread and tomatoes, the chicken goes further than just grilling up some chicken for a house full of hungry teenagers.
This is also a solution for your family dinner because the cut chicken cooks faster and the couscous will be done in less than five minutes. I love this dinner because it’s quick and easy AND full of flavor. Mustard + horseradish is a magical combination and a little mayo helps keep the chicken moist while it cooks. Chicken breasts have a tenancy to dry out.
Mustard Kabobs with lemon couscous
Serves 4
1 cup mayonnaise
½ cup Dijon mustard
2 teaspoons horseradish
2 lemons, one zested and both juiced
2 pounds chicken breast, cut into cubes
2 cups cherry tomatoes
1 large loaf crusty bread (cut into about 2 cups bread cubes)
1 cup couscous
1 ¼ cup chicken stock
2 tablespoons olive oil
salt and pepper
¼ cup parsley, chopped
STEP 1
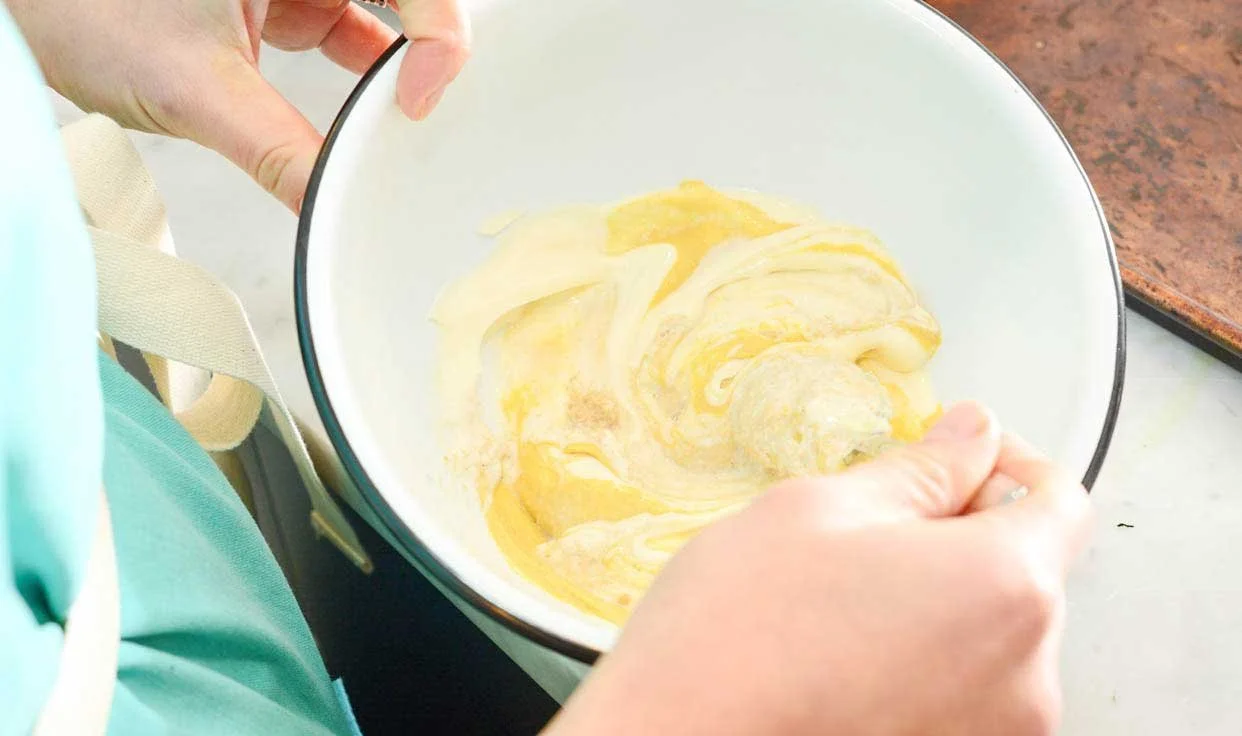
In a large bowl, whisk together mayonnaise, mustard, horseradish, lemon zest and juice. Scoop out a ½ cup to use for dipping sauce. Add the chicken to the large bowl and coat all of the pieces evenly.
STEP 2
Preheat broiler to 500 degrees. Or heat the barbecue.
Line a baking sheet with foil. Thread chicken, tomatoes, and bread on bamboo skewers alternating every other one. Place skewers on the foil covered sheet. Pop into the hot oven and watch carefully. Flip skewers every five minutes to evenly brown on all sides. Chicken should be fully cooked after 15 minutes.
It’s the same routine on the barbecue - keep on a medium high heat and flip until the chicken is cooked through. The size of your cubes will determine how long the chicken needs to cook.
STEP 3
Bring chicken stock to a boil over high heat. Once it comes to a boil, shut the heat off and pour in couscous. Let sit – covered - five minutes. Fluff with a fork to loosen up the grains. Pour in oil, lemon juice, parsley, and season with salt and pepper. Toss to coat all couscous completely. Leave covered until ready to serve.

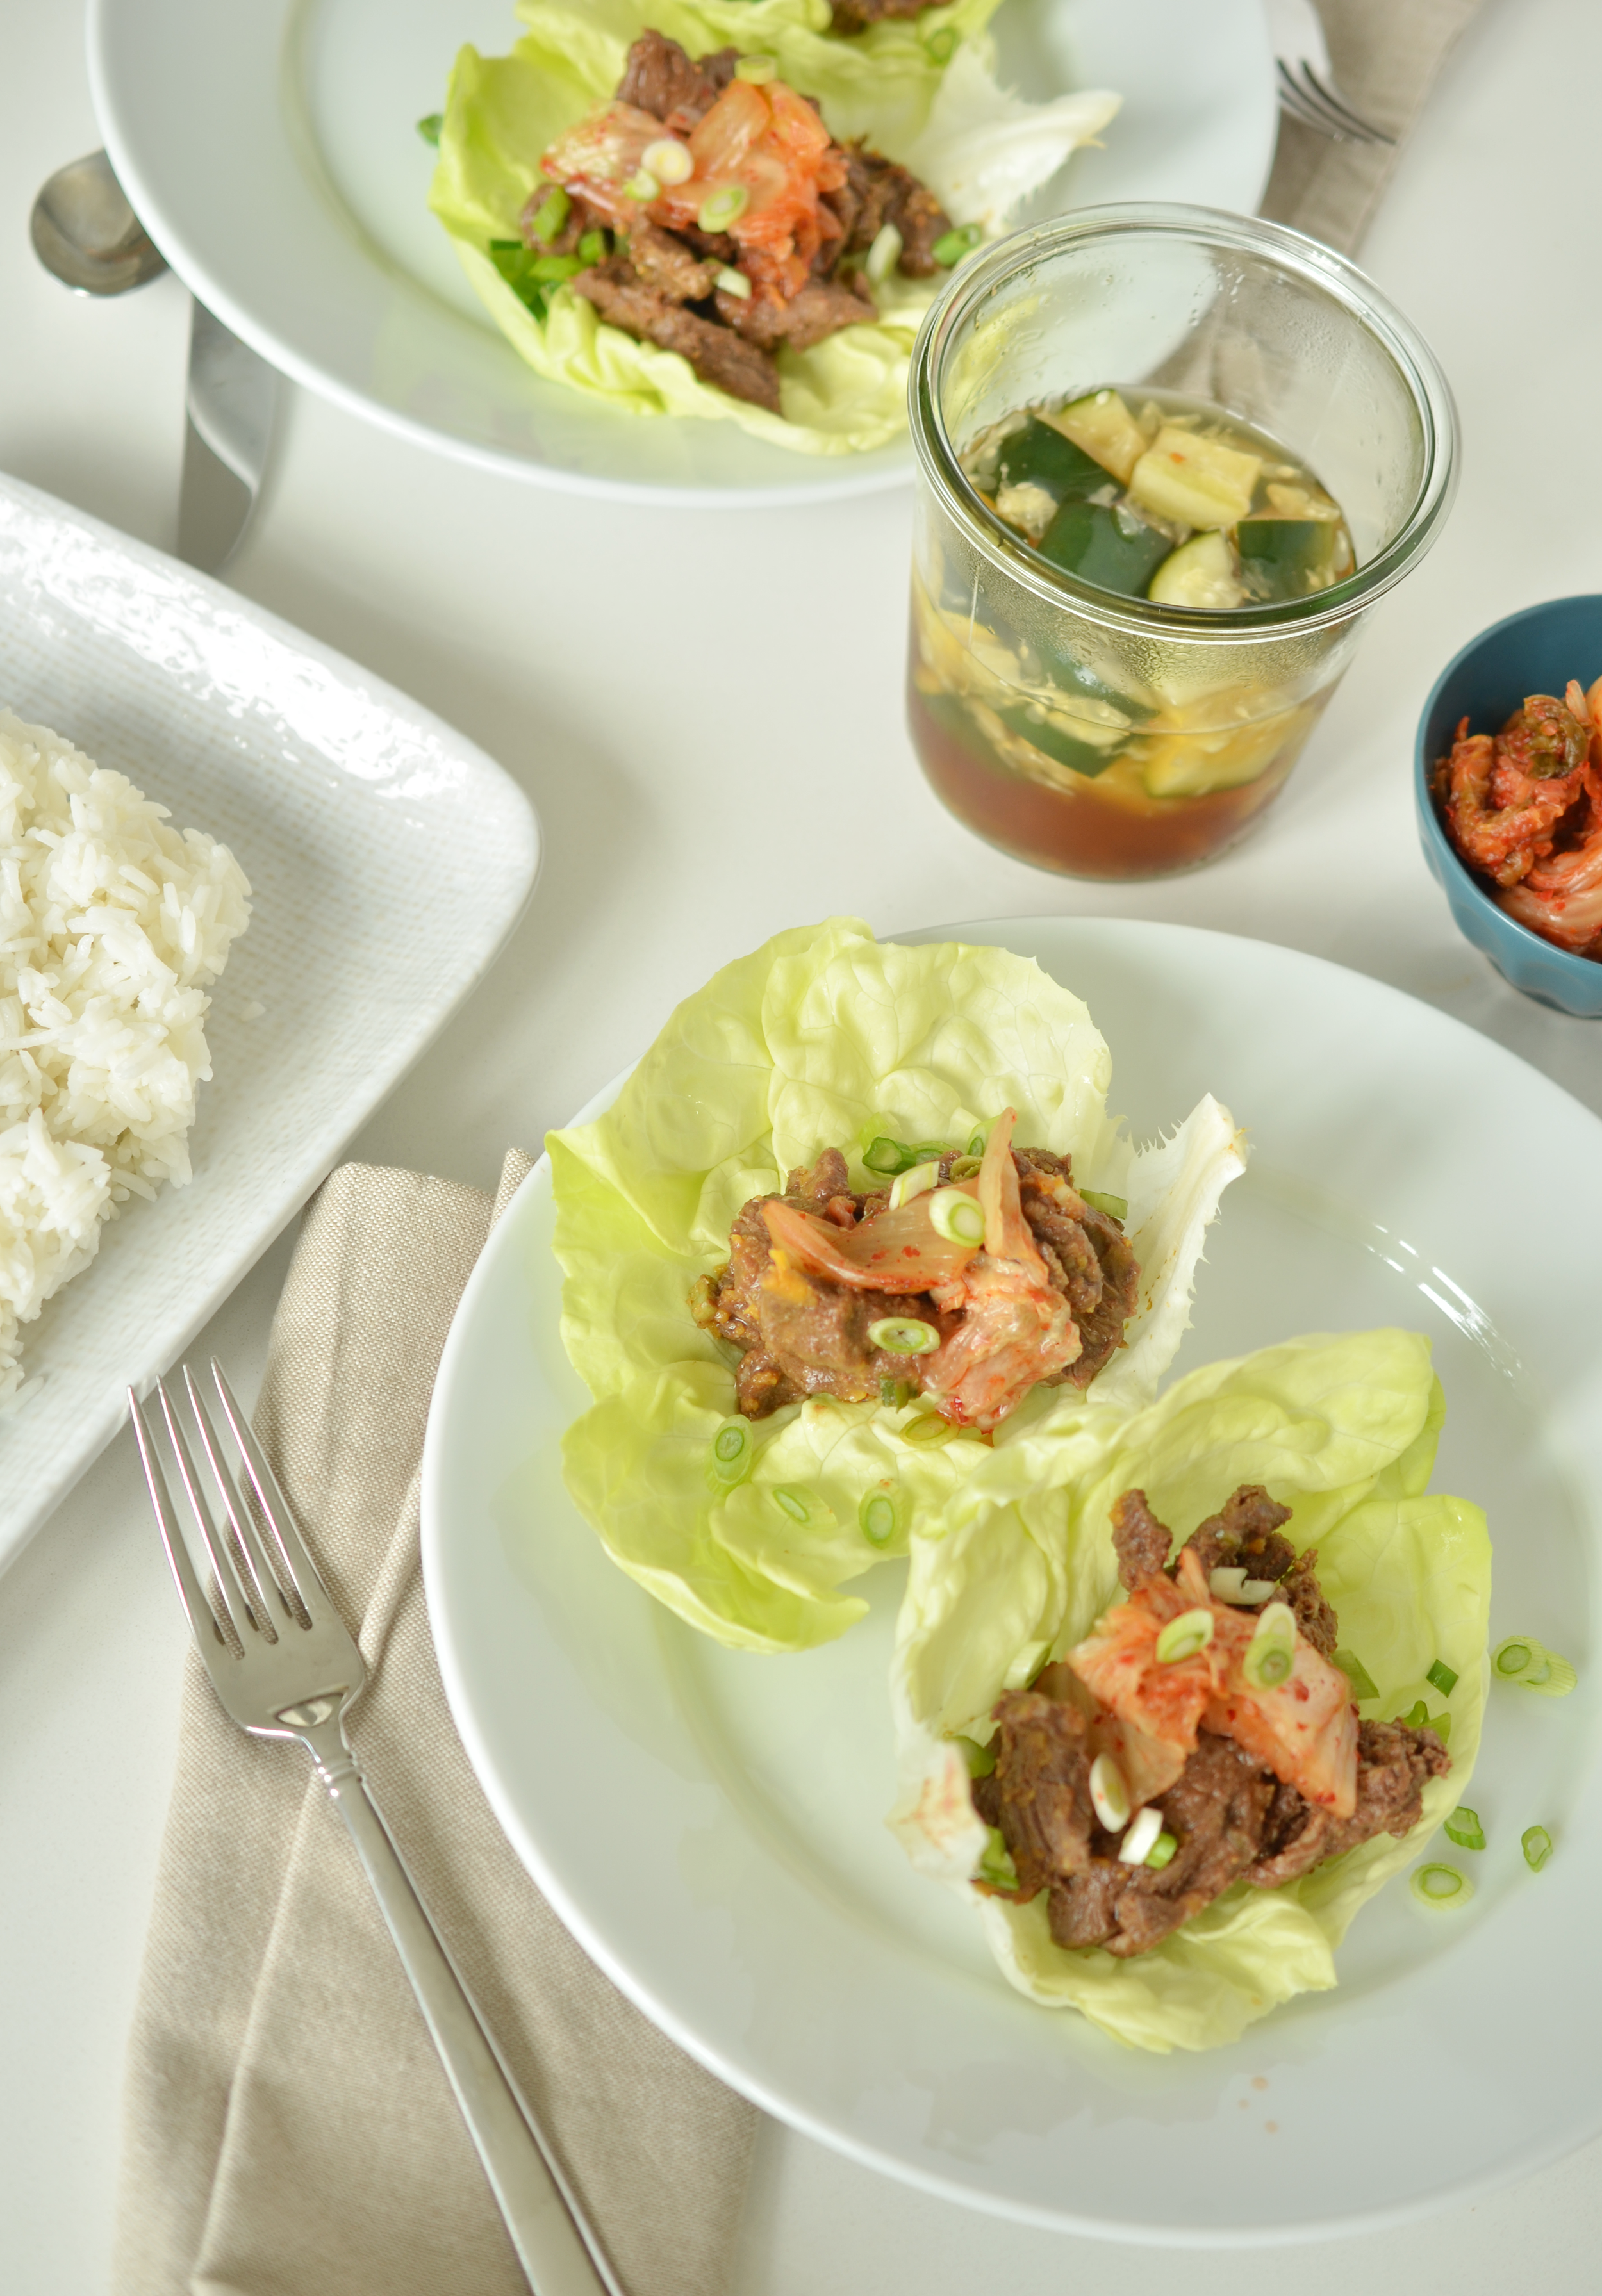
Bahn Mi Meatball Subs
I went through a phase where almost every night we ate our dinner in meatball form. I cannot tell you how much I love to make a meatball. It’s such a simple dinner - and it’s done so easily - and cheap.
Bahn Mi is one of my favorite sandwiches ever and turning it into a meatball sub seemed like a natural. Especially because the meat does not need to be marinated - you can just mix all of the meat + flavorings and they become a well flavored meatball in minutes.
This seems like a lot of steps but not one of these steps are hard. Or time consuming. It’s especially handy because you can make up all of the vegetables and meatballs ahead of time - then just heat when it’s time to eat. It’s the perfect dinner for when there are one million sports events, after school activities, etc.

Bahn Mi Meatball Subs
serves 4
1 cup rice vinegar
1 cup water
1 tablespoon brown sugar
1 tablespoon salt
1/2 cucumber, cut into matchsticks
1 carrot, cut into matchsticks
2 lb ground pork
1 cup panko
1 egg, lightly beaten
1 tablespoon chopped cilantro, plus more for garnish
1 teaspoon sriracha
1/2 teaspoon fish sauce
1 tablespoon fresh grated ginger
1/2 jalapeno, chopped
1/4 cup mayonnaise
1 teaspoon sriracha
1/2 teaspoon fish sauce
brioche buns
STEP 1
Preheat oven to 350 degrees.
Place the sliced carrots and cucumber in a glass jar. In a small saucepan, combine vinegar, water, brown sugar and salt. Bring to a boil and let simmer until all sugar and salt is dissolved. Pour vinegar mixture over the carrots and cucumber and let sit while you make the rest.
STEP 2
In a bowl, combine the pork, panko, egg, chopped cilantro, sriracha, fish sauce, fresh grated ginger and jalapeño. Mix well with your hands and form into meatballs. Wet hands make the meatballs form more easily. Place the meatballs on a baking sheet and pop in the preheated oven for 10-15 minutes until browned on top.
STEP 3
Mix together mayo, remaining sriracha, and remaining fish sauce.
STEP 4
When the meatballs are done, top the bun with the cooked meatballs, pickled vegetables, and the mayo sauce. Eat while hot!
HOT TIPS
These meatballs freeze really well. Freeze once they are fully cooked and cooled. Reheat on the stove or in the microwave.
Use your own discretion when adding jalapeño and sriracha. You know how much spice your family likes!

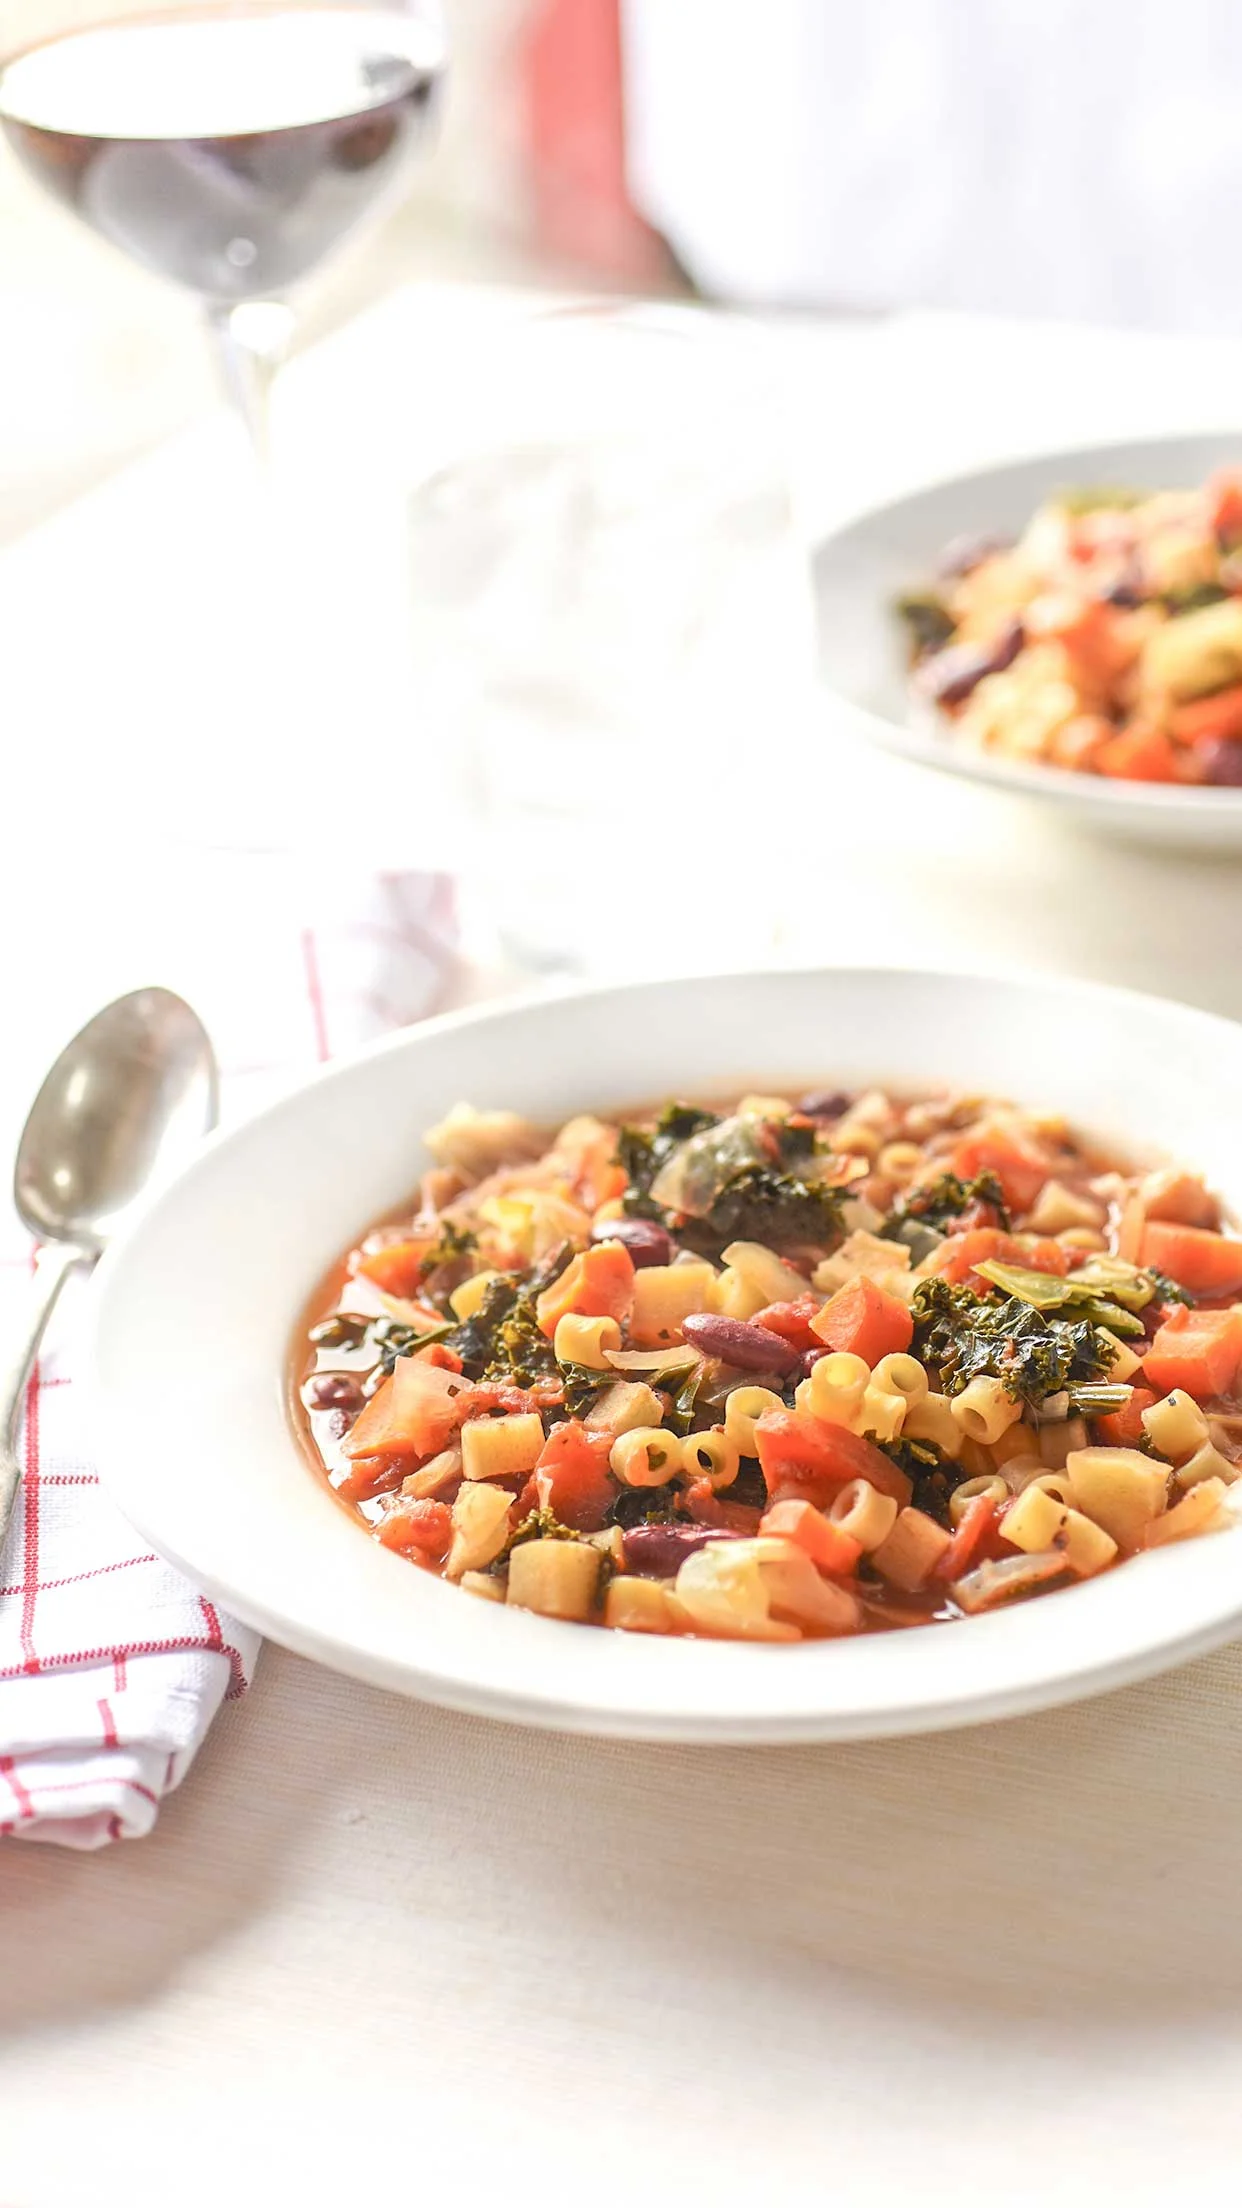
Perfect Fall Soup | White Bean Soup

Words cannot express how much I love this soup. It’s a perfect early fall soup - and a great aprés ski soup! It’s so fast to make and full of hearty and healthy vegetables. Obviously, my kids groan when they see the kale - you can leave it out - but it softens so much in the pot that it’s not super obvious and it’s so good for them if they’ll not pick it out!
I like to make this soup during the early fall because we are scrambling from one team sport to another team sport. Or activity. Or some volunteer job I didn’t remember I signed up for. I can make this early in the day and then have it done. Today I’m actually making it at 10am and popping it in the fridge. We are hosting a party tonight, one kid off to baseball and another off to swimming. I’ll bring this out when Adam is starving (he never eats enough at a party) and when the kids get home from practice. It heats up easy. I throw a loaf of bread on the side too.


White Bean & Sausage Soup
Serves 4
1 lb pork sausage
1 sweet onion, sliced
2 cloves garlic
½ tsp red pepper flakes
1 cup white wine
1 can garbanzo beans
1 can cannellini beans
4 cups kale, chopped (basically one small bunch)
28 oz chopped tomatoes
2 cups chicken stock
1 can artichoke hearts
1 bell pepper, chopped
2 teaspoons dried oregano
2 teaspoons dried basil
½ cup Parmesan cheese
STEP 1
In a large stock pan, brown sausage with onions and garlic. Add red pepper flakes and season with salt and pepper.
STEP 2
Deglaze the pan with white wine scraping any brown bits off the bottom as it cooks. (2 mins)
STEP 3
Add beans, kale, artichokes, tomato, red bell pepper, stock, and herbs. Bring to a boil. Reduce to a simmer and cook 15-20 minutes.
STEP 4
Serve hot with parmesan cheese.
NOTES:
Swap out the kale for chard if it's easier to find or you have too much in the garden.
You can always add more stock to this soup and have it serve a large crowd on demand!

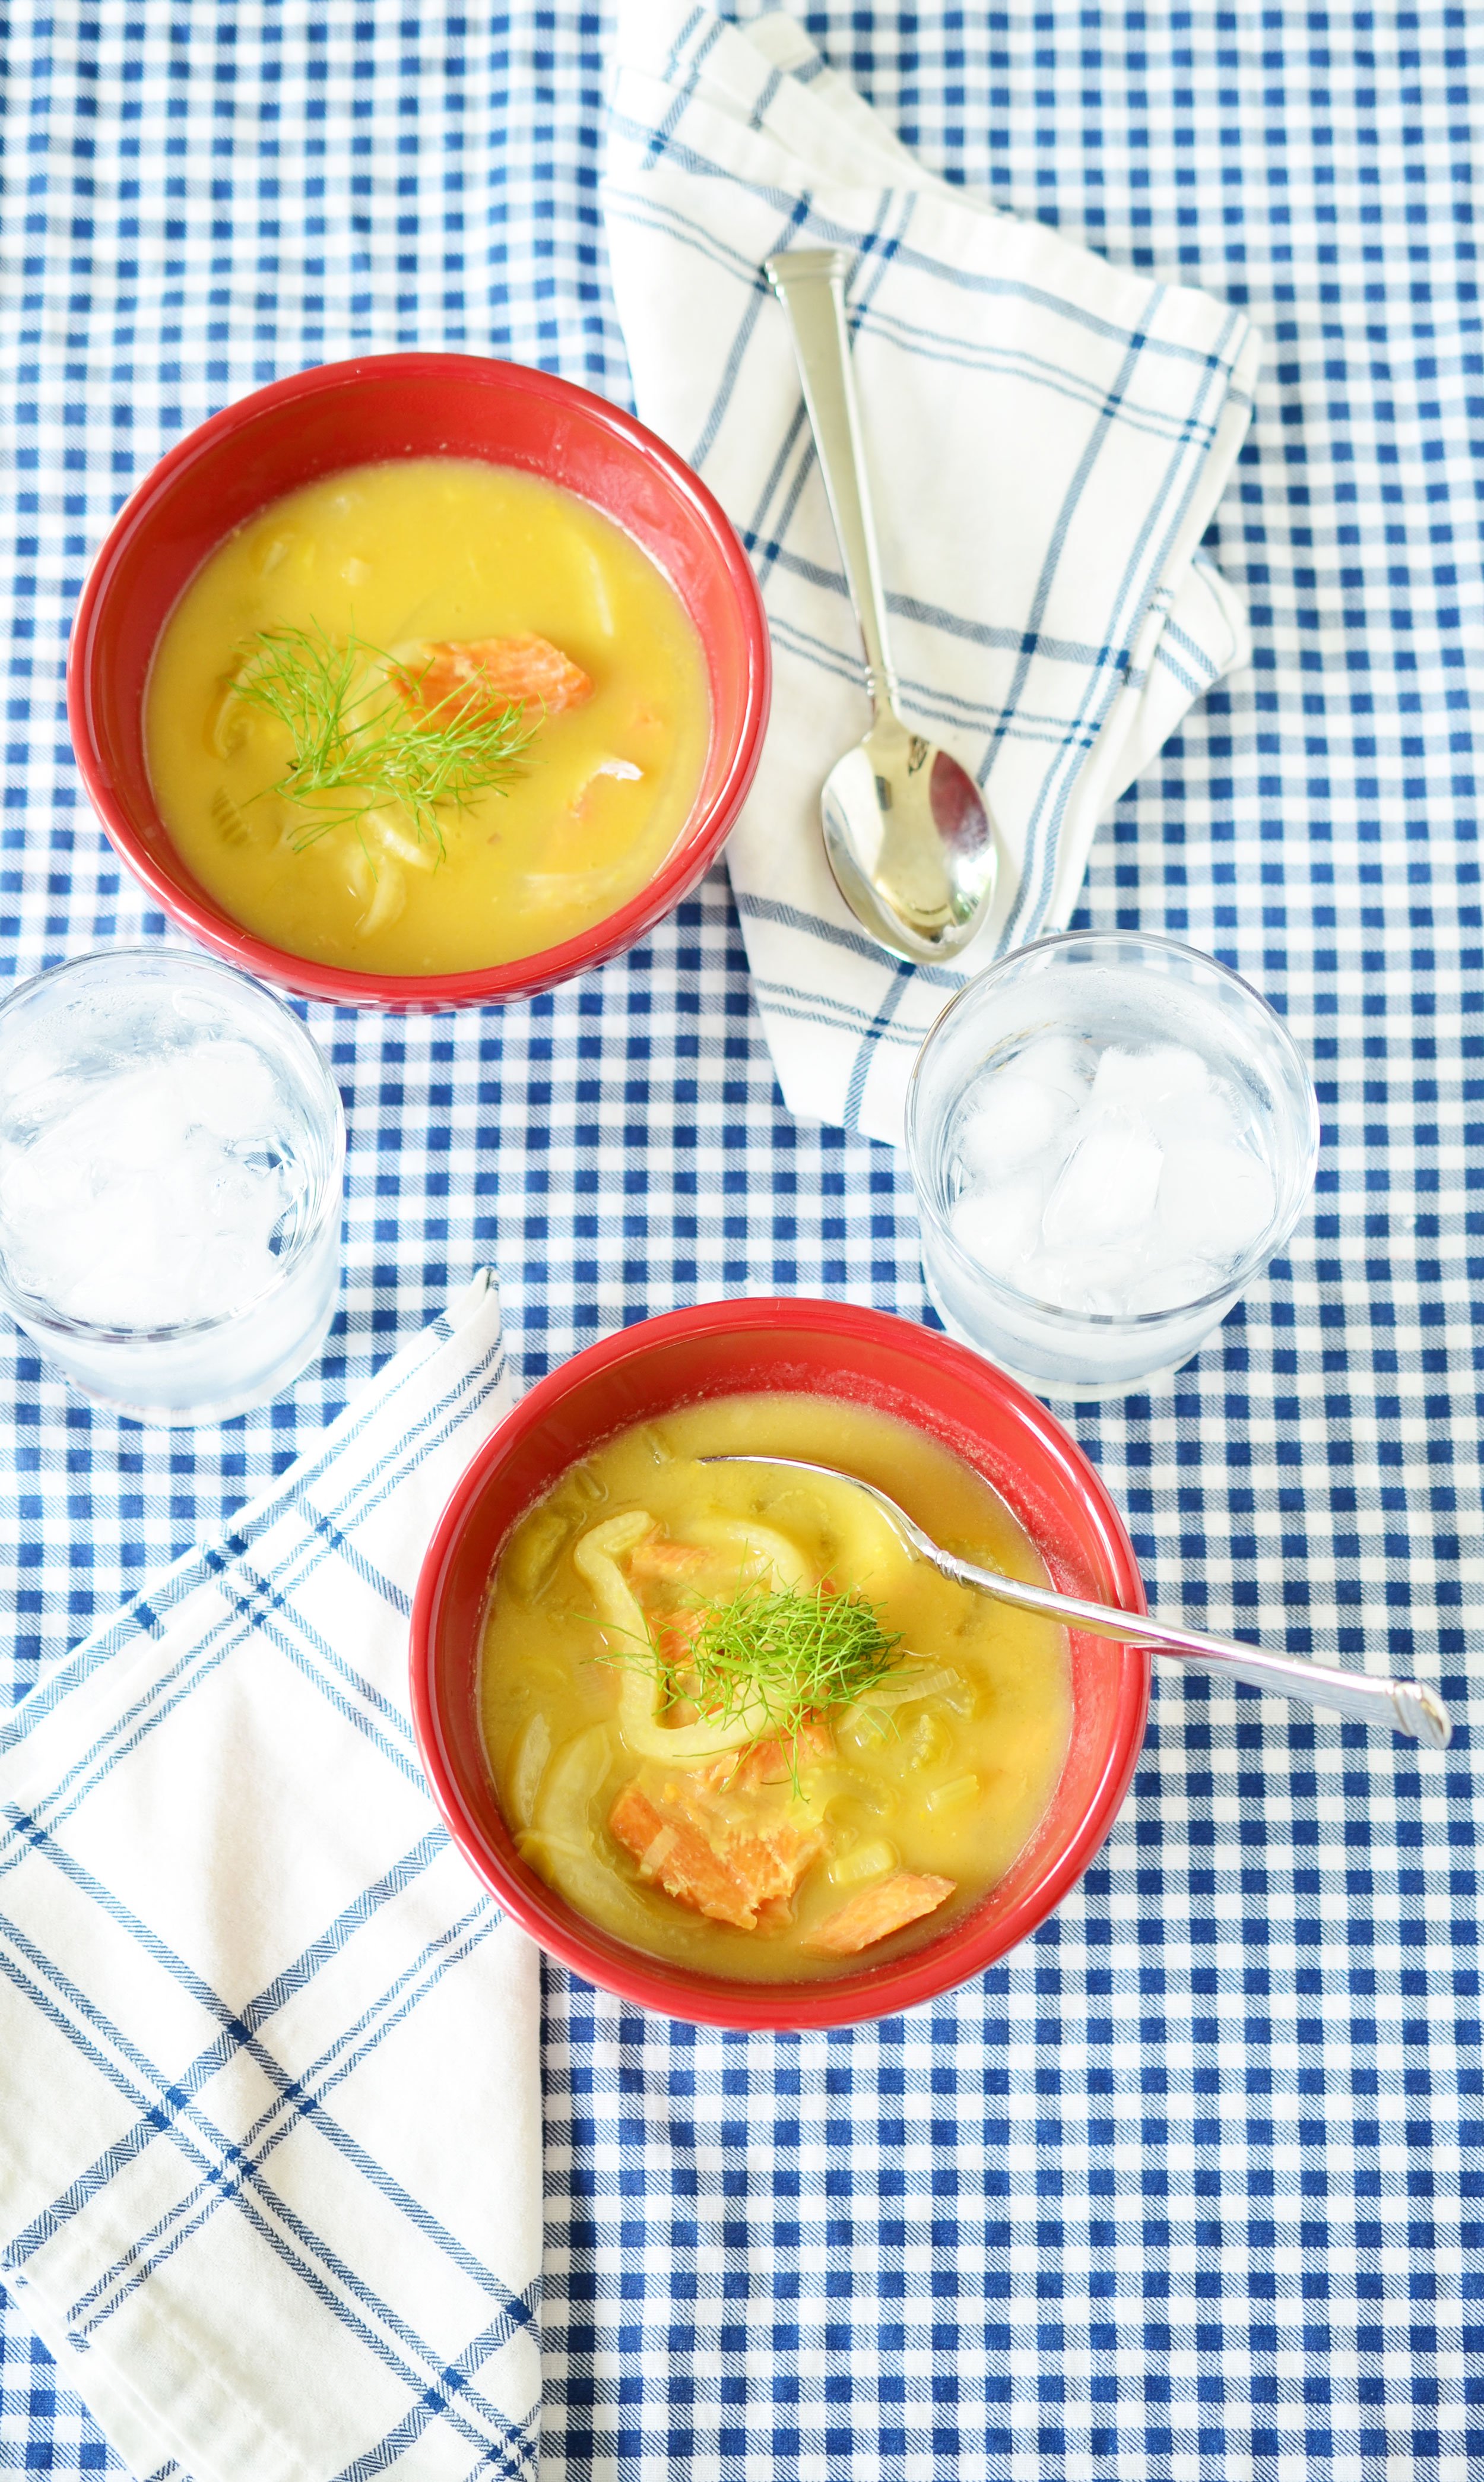
Smoked Trout Chowder
Every year my husband and my dad go fishing. They come home with coolers full of trout. The past few years, Lars has gone too. And the fish seems like it’s tripled. It’s a good fish when it’s fresh, but you can only eat so much fresh trout before you need to do something with it. So we smoke it.
And then all of that fish is now smoked trout that we have to do something with! Luckily, if you vacuum seal it and freeze it, you can keep it until the next years fish comes in. The boys go fishing again in a week and we still have a freezer full of fish so I am making it into a variety of dinners - including my favorite dinner ever - CHOWDER!

Chowder is my number one favorite soup. And probably my number one diner order when we’re on the West Coast. And often on the East Coast - but as a West Coast native, I think ours is better.
This chowder is inspired by our trip last summer to Sweden. When we were there we had the best fish soup I’ve ever had in my life. It was 90% because it had fennel and I adore fennel - but also, it was just a great classic fish soup.
I’ll share that exact recipe soon, but in the mean time - here is my version of this using distinctly West Coast ingredients (the trout). You can also check out my other chowder recipes that are linked below!
Smoked Trout Chowder
serves 4
1 cup chopped celery
1 chopped leek (cleaned and just the white part chopped)
2 tablespoons olive oil
1 bulb fennel, chopped
2 cloves garlic
1/4 cup flour
1 cup white wine
4 cups fish stock
1 tablespoon Pernod or ouzo
1 bay leaf
1 handful thyme (6-8 sprigs)
1 handful parsley (6-8 sprigs)
2 large filets smoked trout (about 1/2 pound)
STEP 1
In a large stock pan, heat the oil and cook the leek and celery over medium low heat until they are softened. Then add the fennel and garlic and cook until just lightly softened.
STEP 2
Add the flour, sprinkling it over the top and then stir and cook until a paste forms. Pour in the wine and stir until thickened.
STEP 3
Add the stock, bay, herbs, and Pernod. I like to tie the herbs up in a cheese cloth pouch so they don’t add leaves to the soup. Stir and let simmer.
STEP 4
Let everything come together for a few minutes then add the fish. Serve with the fronds of the fennel on top and eat hot.
NOTE: You can freeze this soup and reheat slowly on the stove which makes it the perfect emergency dinner


Classic Clam Chowder
This is my classic clam chowder that is exactly like the best West Coast diner chowder you’ve ever had.


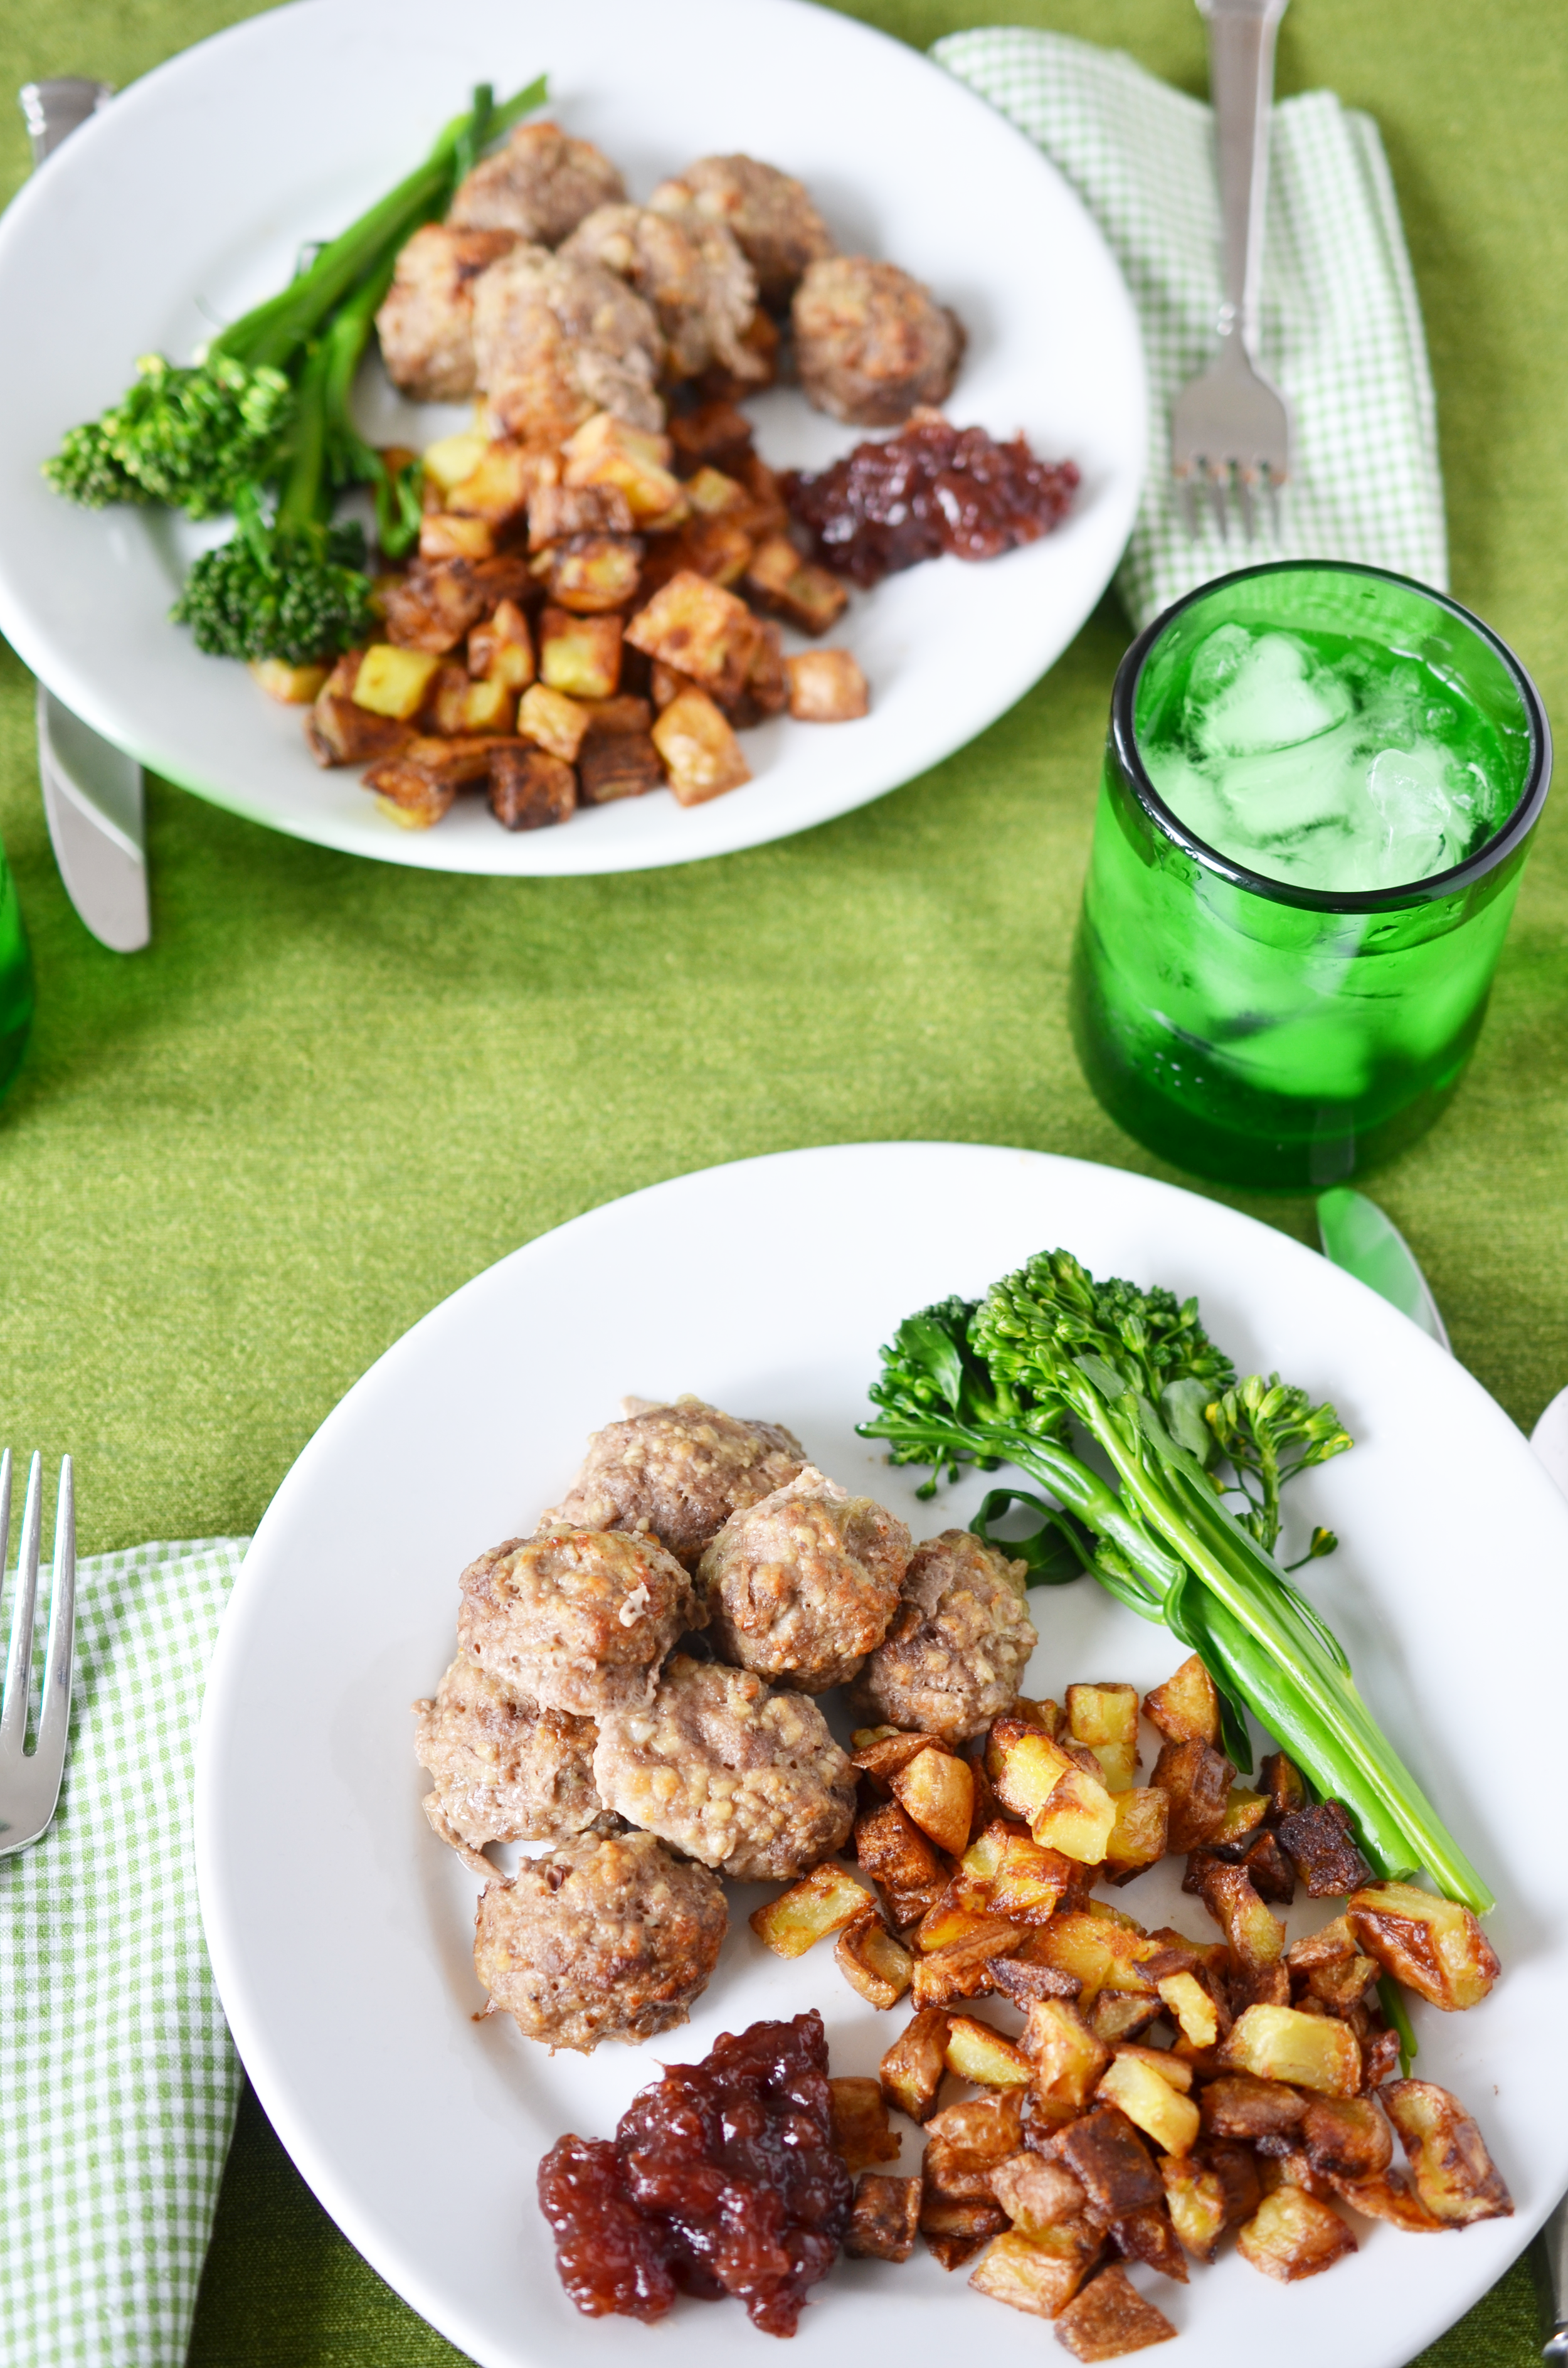
Weeknight Meatloaf + Rosemary Potatoes
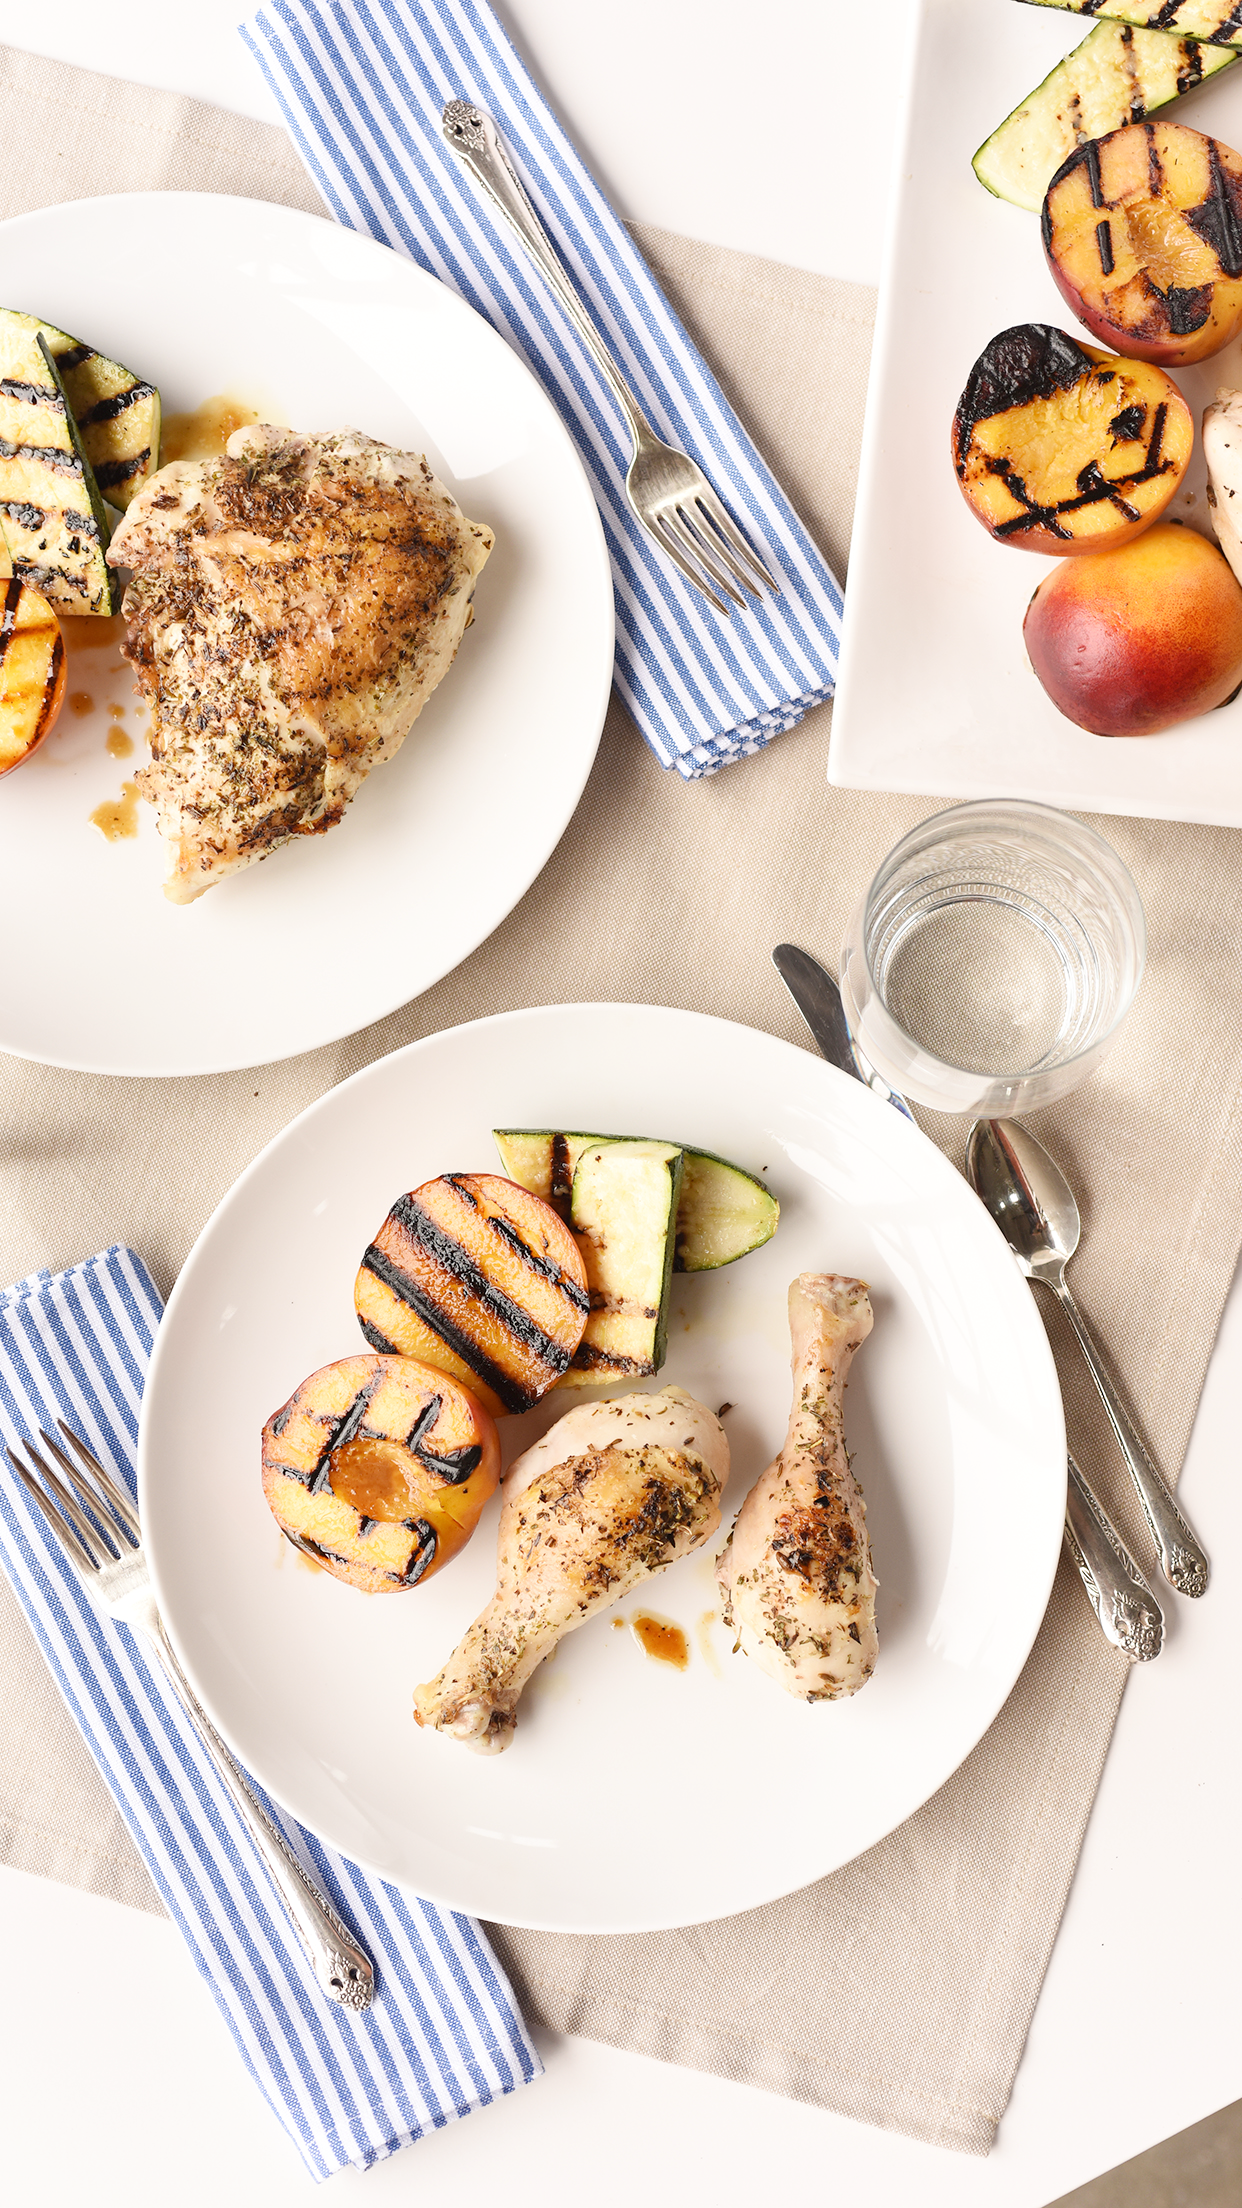
Every week I ask the family what they want for dinner. And every week Mr Hedin says “meatloaf.” Literally, every week. Everyone else groans. I end up making it every few weeks but not as often as Mr Hedin would like.
The problem with meatloaf is that it’s usually too thick to cook easily for dinner. I found that by flattening the loaf to a reasonable thickness, I can make this in about 30 minutes. Plus - I can pop the potatoes in the oven on a baking sheet next to the meatloaf and they are done at the same time (-ish). While it bakes, I usually make a green salad. But you could also throw some asparagus or broccoli in the oven with everything else.

Weeknight Meatloaf
Serves 4
2lb ground beef
1 cup ketchup
1 grated onion
1 tsp worchestershire
1 egg
1 cup bread crumbs
1 clove garlic, grated
¼ cup milk
½ lb potatoes, slice in half
4 sprigs rosemary
salt
STEP 1
Preheat oven to 400 degrees.
Combine together ground beef, ketchup, onion, worchestershire, egg, breadcrumbs, garlic, and milk.
STEP 2
Form into a flat loaf on a rimmed baking sheet lined with foil. Squeeze ketchup on top. Bake 30 minutes until done all the way through. I usually make sure the middle is not pink and then I know it’s done. Because it’s so thin, it should cook quickly. You can also use a thermometer and make sure your beef is at 180 degrees.
STEP 3
Preheat oven to 400 degrees.
Toss potatoes with rosemary and salt. Bake 20-30 mins until crispy. I put both in the oven at the same time and they are done at the same time - usually!


In-No-Way-Authentic Dan Dan Noodles
We are a mostly non-dairy house. That severely limits some of the options for dinner. Luckily, Asian inspired dinners are always an option. I am constantly recreating things we’ve had from takeout or making up things that feel like our favorite take out places.
This is a mash up of those inspirations. Dan Dan noodles are a Szechuan dish that I have completely changed from it’s original form by using curry (not Chinese) instead of the traditional sambal olek and removed the Szechuan peppers so my kids will actually eat it.
Is it authentic? No. Is is even Dan Dan Noodles? Hard to say. But it’s delicious and we love it. I think you will too.


In-no-way-authentic Dan Dan Noodles
Serves 4
1 red onion, sliced
2 tablespoons olive oil
2 lb ground pork
2 tbs red curry paste
2 tbs rice vinegar
2 tbs soy
2 tsp ginger
2 cloves garlic
2 carrots, grated
2 cups chicken stock
1 lb pappardelle noodles
4 scallions, whites and greens chopped
1 cup bean sprouts
¼ cup peanuts, chopped
STEP 1
Heat two tablespoons of olive oil in a large sauce pan and cook the onions slowly until translucent. Use low to medium heat so they cool nice and slow.
STEP 2
Add ground pork with red curry paste, rice vinegar, soy sauce, ginger, and garlic to the pan and cook until browned.
STEP 3
When meat is browned, add carrots and stock. Stir to combine and bring to a boil.
STEP 4
Add noodles to the pan and stir to cover with stock. Cover and let summer on low until the noodles are done.
STEP 5
When noodles are done serve hot with scallions, bean sprouts and peanuts.


Heart Throb Pasta + love-ly breadsticks
Valentine’s Day is a family day at our house. At least it has been for the last sixteen years. We’ll see if the teenagers will change things up this year. But I also way cook a fun Valentine dinner for the whole family. There’s nothing sacred about February 14 (sorry to burst your bubble) that Mr. Hedin and I need to run out to an expensive dinner on that exact day.
I’ve done heart shaped make-your-own pizza, steaks, and plain old red sauce pasta. Recently I discovered that you can cook pasta in beet water and have it turn out red/pink-ish. It’s not perfectly even color - but it’s all natural and you can pop the beets in to the pasta sauce too! I think it’s a cool thing for younger kids to se happen. My teenagers did think it was cool. I got a shrug, but I’ll take a shrug.

The trick to getting the pasta to cook and the beets to be done is to start the beets early when you put the water in the pan. And then to get the color to stick, turn the water off when the pasta is basically done (but not crunchy) and let it rest all together. Then when you go back and drain the pasta - keeping some water! - the pasta is a lovely little red shade.
While the pasta sits, you can get the breadsticks going and tell one of your kids to mix up a green salad.


Heart throb Pasta
With love-ly bread sticks
Serves 4
1 red bell pepper, sliced
1 sweet onion, sliced
2 cloves garlic, chopped
2 tbs olive oil
2 beets
½ lb pasta
½ cup parmesan cheese
1 package crescent dough
STEP 1
Bring a large pot of water to a boil. Slice the beets in half and add them to the water as it begins to boil. When the water has come to a boil, add the pasta.
STEP 2
When the pasta is nearly cooked, turn the heat off and let rest for 30 minutes.
Preheat the oven to 375 degrees.
STEP 3
Unroll the package of crescent dough and press together all of the seams. Slice the dough into strips. Twist the dough and form it into a heart. Bake 10-12 minutes until golden brown.
STEP 4
Heat a skillet with the olive oil. Cook the peppers, onion, and garlic over medium heat until softened. Zest in lemon juice and toss with cooked beets.
STEP 5
Drain the pasta – reserving at least one cup of pasta water – and toss the pasta with the peppers. Add the pasta water, a little at a time, and toss until a sauce has formed. Remove from heat and sprinkle parmesan on top.


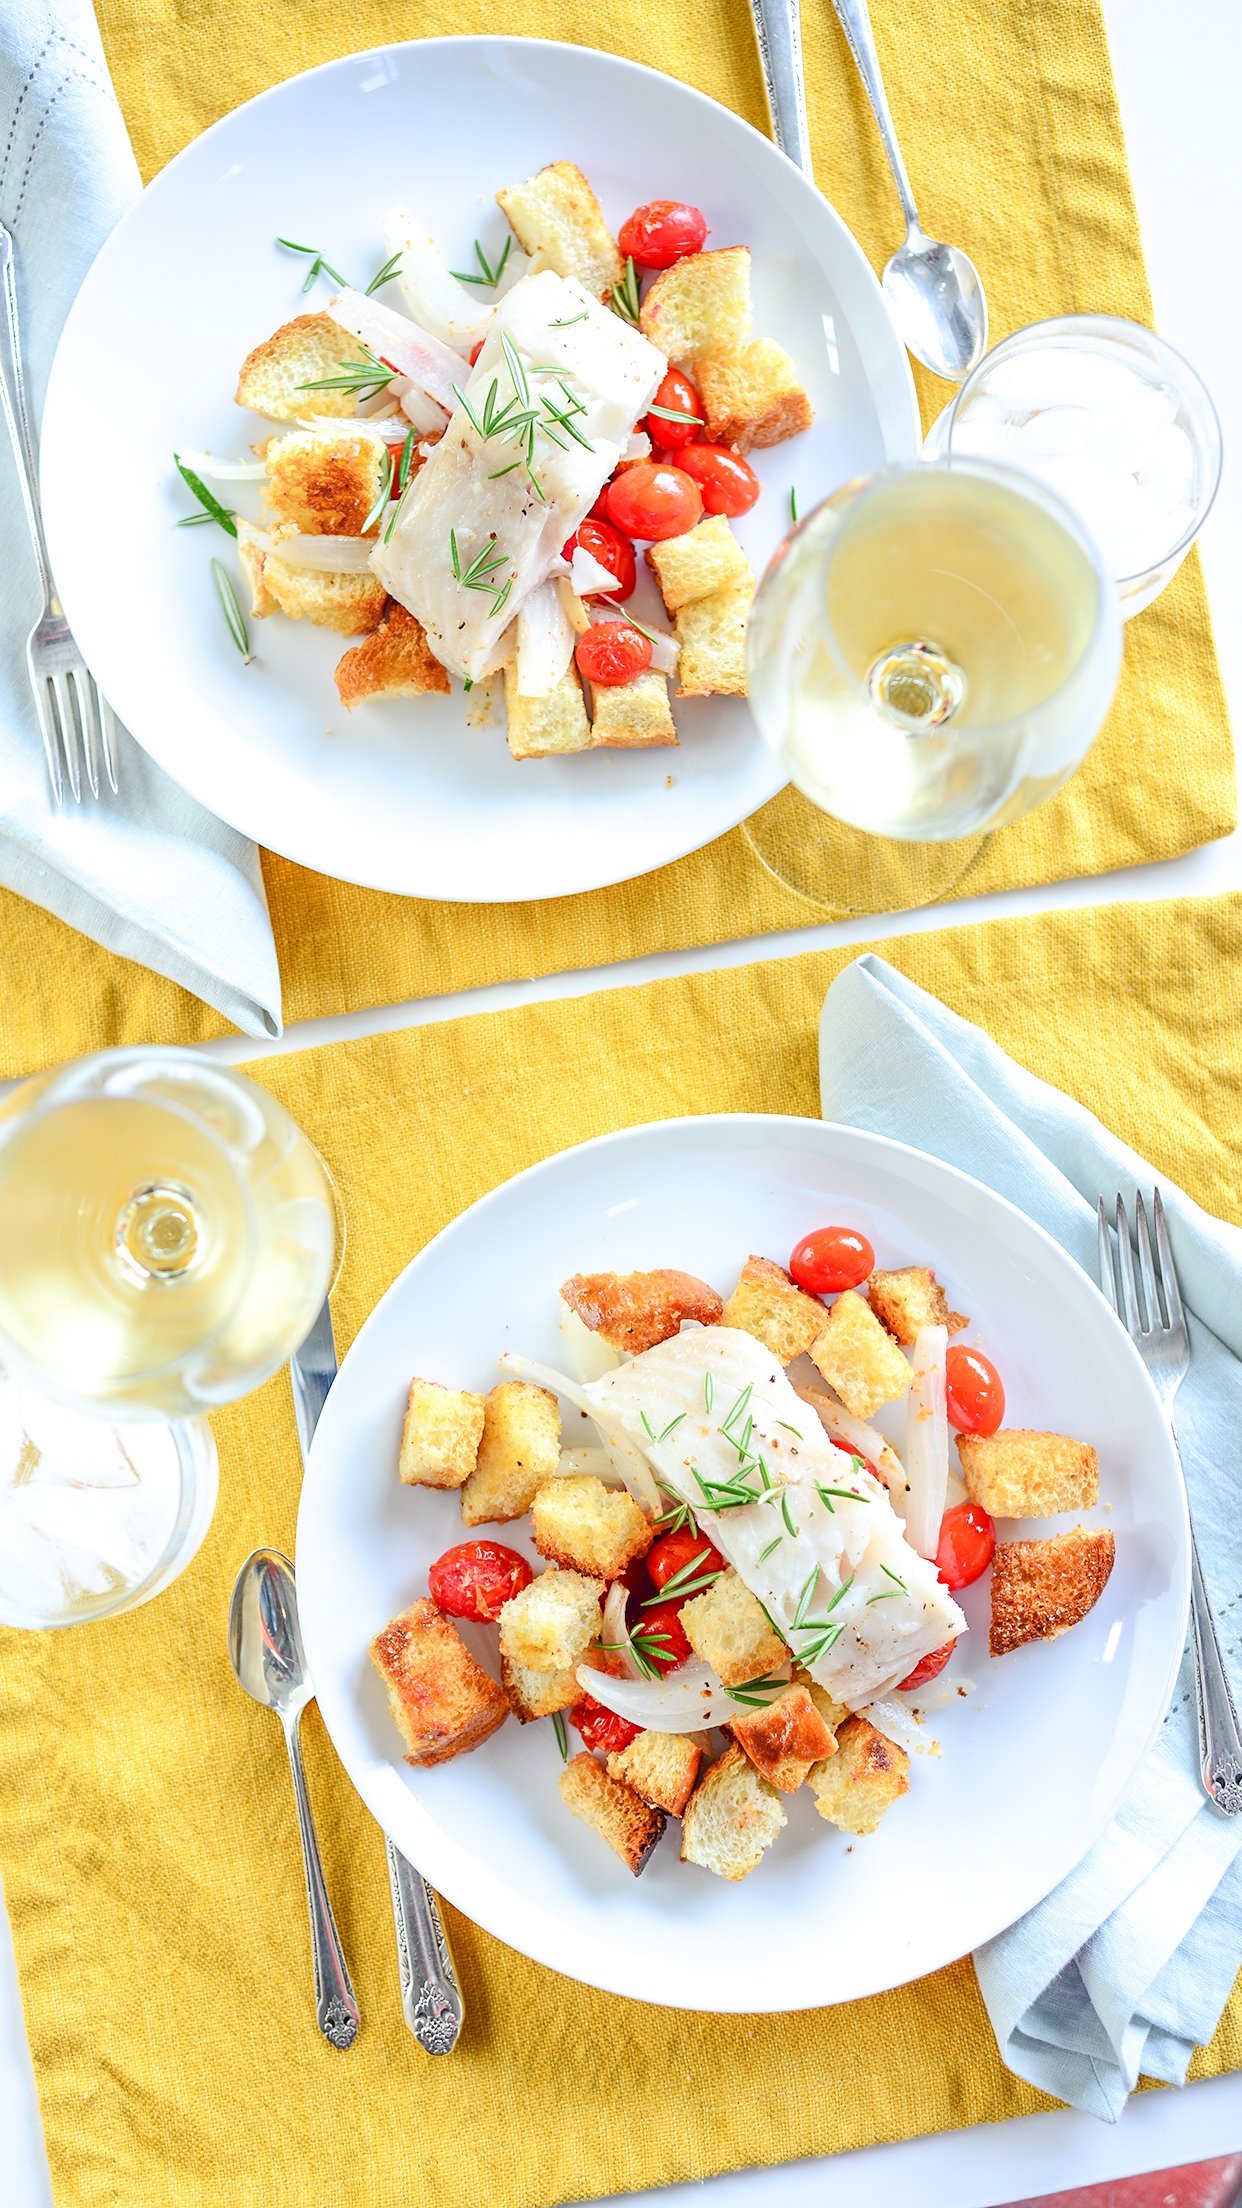
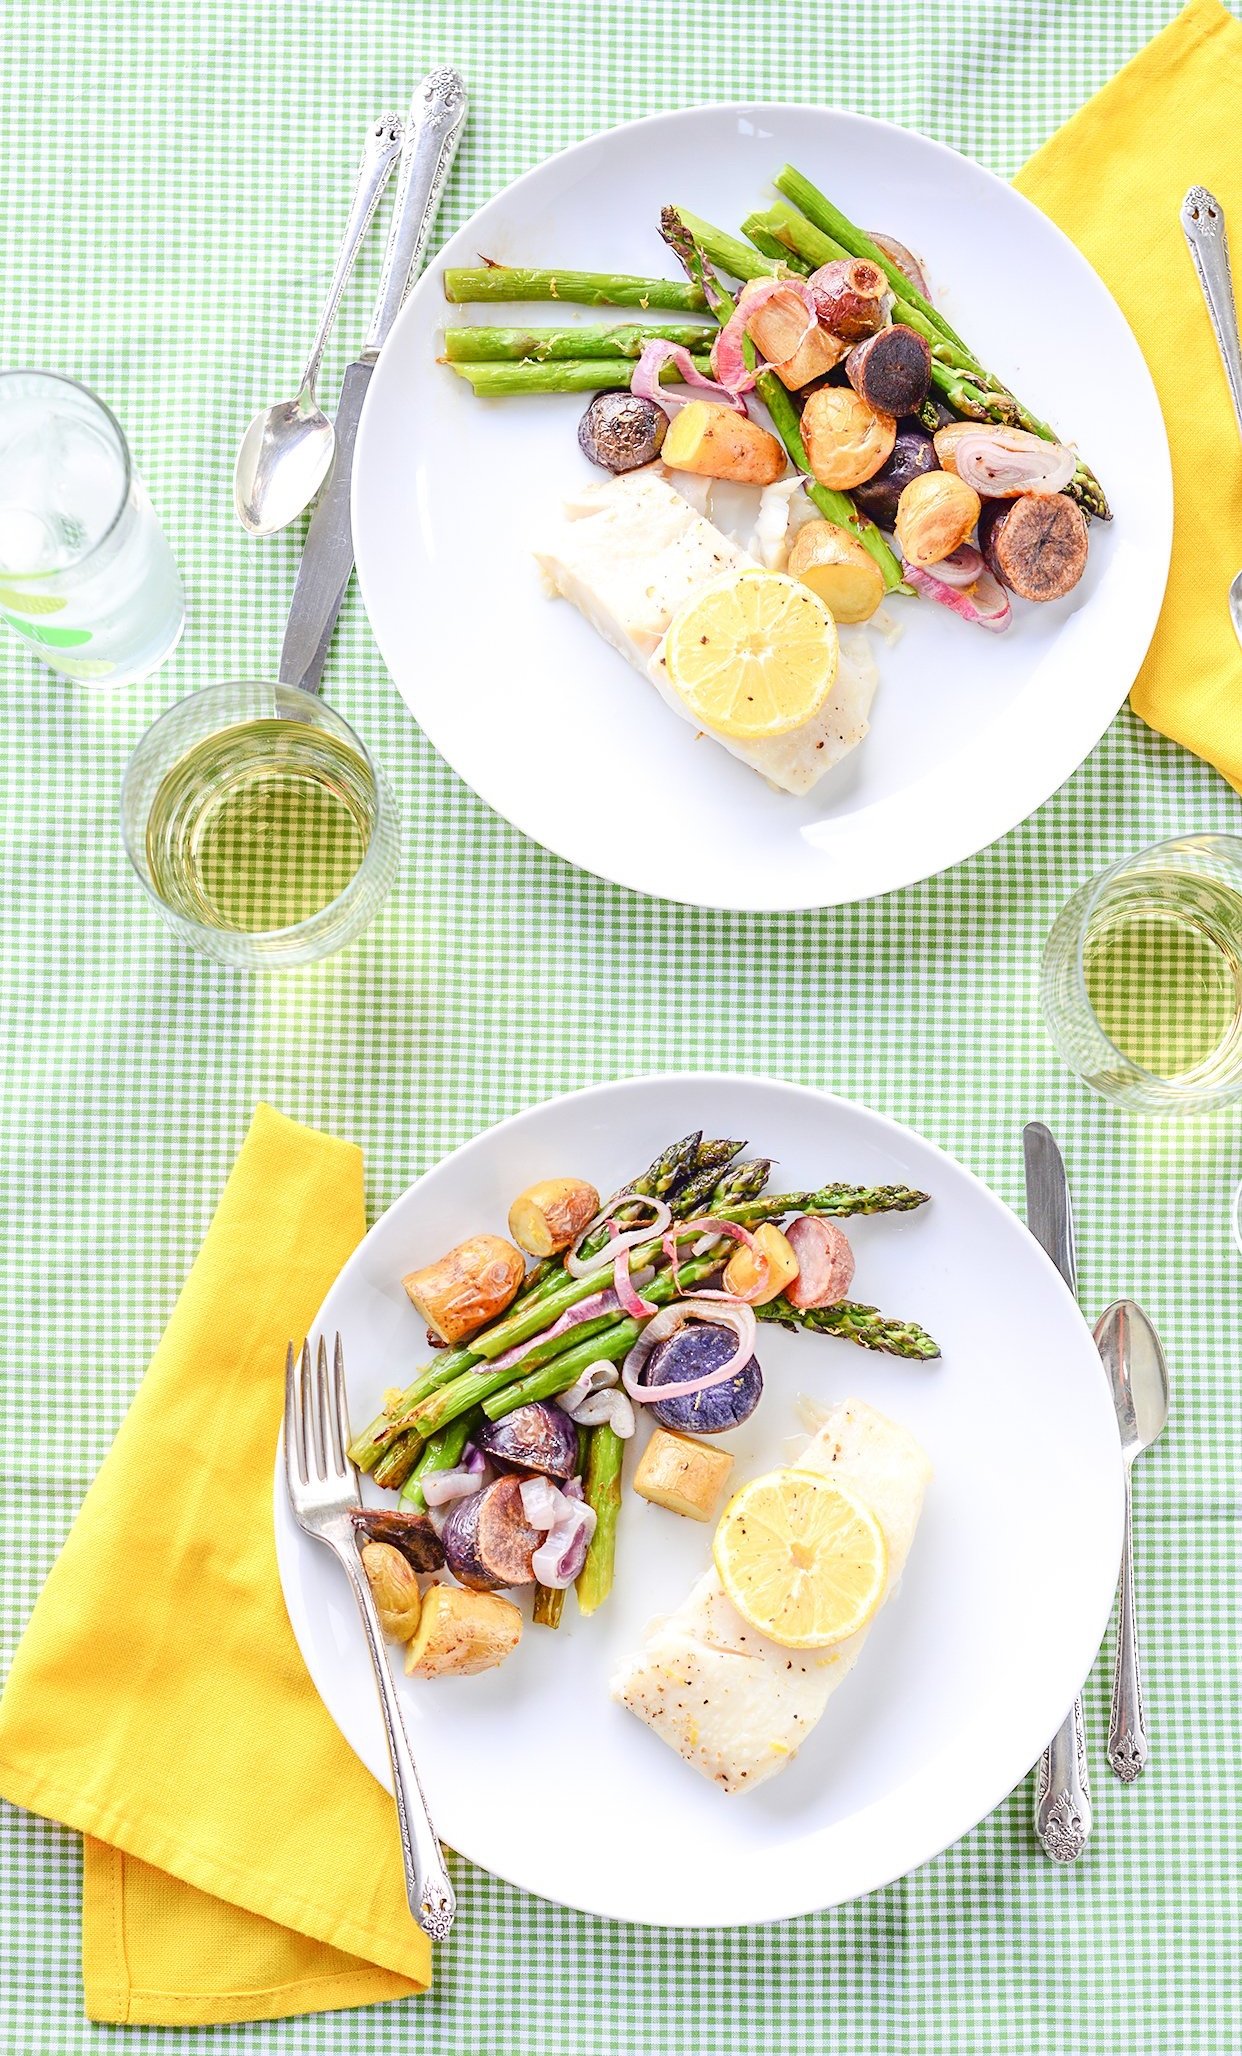
Roasted Black Cod + Tomato Bread Salad
I love a sheet pan dinner. If they aren’t the hero of the weeknight, then I don’t know what is. This one is especially great because it can totally be a fancy night dinner - and done so easily. Do you need to celebrate a birthday? A good grade? Anniversary? This one is the one.

I like this dinner in the winter because that’s usually when you can find a good black cod. If you can’t find good black cod, then skip this. Do not buy mediocre fish. Buy the good stuff. It’s about 1/2 pound per person - a little less if you have light eaters (read not teenagers). You can do this with any thick fish - it just gets more expensive when you pick halibut instead of cod!
The salad is great too because it’s just a panzanella that cooks ALONGSIDE the fish! Pop everything in the oven - watch the time - and then dinner is done.


Roasted Black Cod
with tomato bread salad
Serves 4
1 ½ lb black cod filet
1 large onion, sliced
2 cups cherry tomatoes
3 tbs olive oil
4 cloves garlic
1 loaf crusty bread
salt and pepper
4 sprigs rosemary
1 lemon, juiced
STEP 1
Preheat oven to 400 degrees.
Line a baking sheet with parchment paper. Place fish in the middle and surround with tomatoes, chopped onion, and garlic cloves. Sprinkle rosemary over top and season with salt and pepper.
STEP 2
Toss bread in 2 tbs olive oil. Spread on a baking sheet and season with salt.
STEP 3
Place fish filled sheet on the upper rack of the oven. Place the bread filled sheet on the lower rack – directly below the fish. Roast 15-20 minutes until fish is cooked and tomatoes have burst. Check the bread periodically and make sure it doesn’t get too brown.
STEP 4
Remove from oven. Remove the fish from the baking sheet and place on a plate to rest. Cover with foil
STEP 5
Toss tomatoes, onions, garlic, and bread together in a bowl. Add remaining oil and the juice of one lemon. Toss again to coat.
STEP 6
Serve fish alongside bread salad.

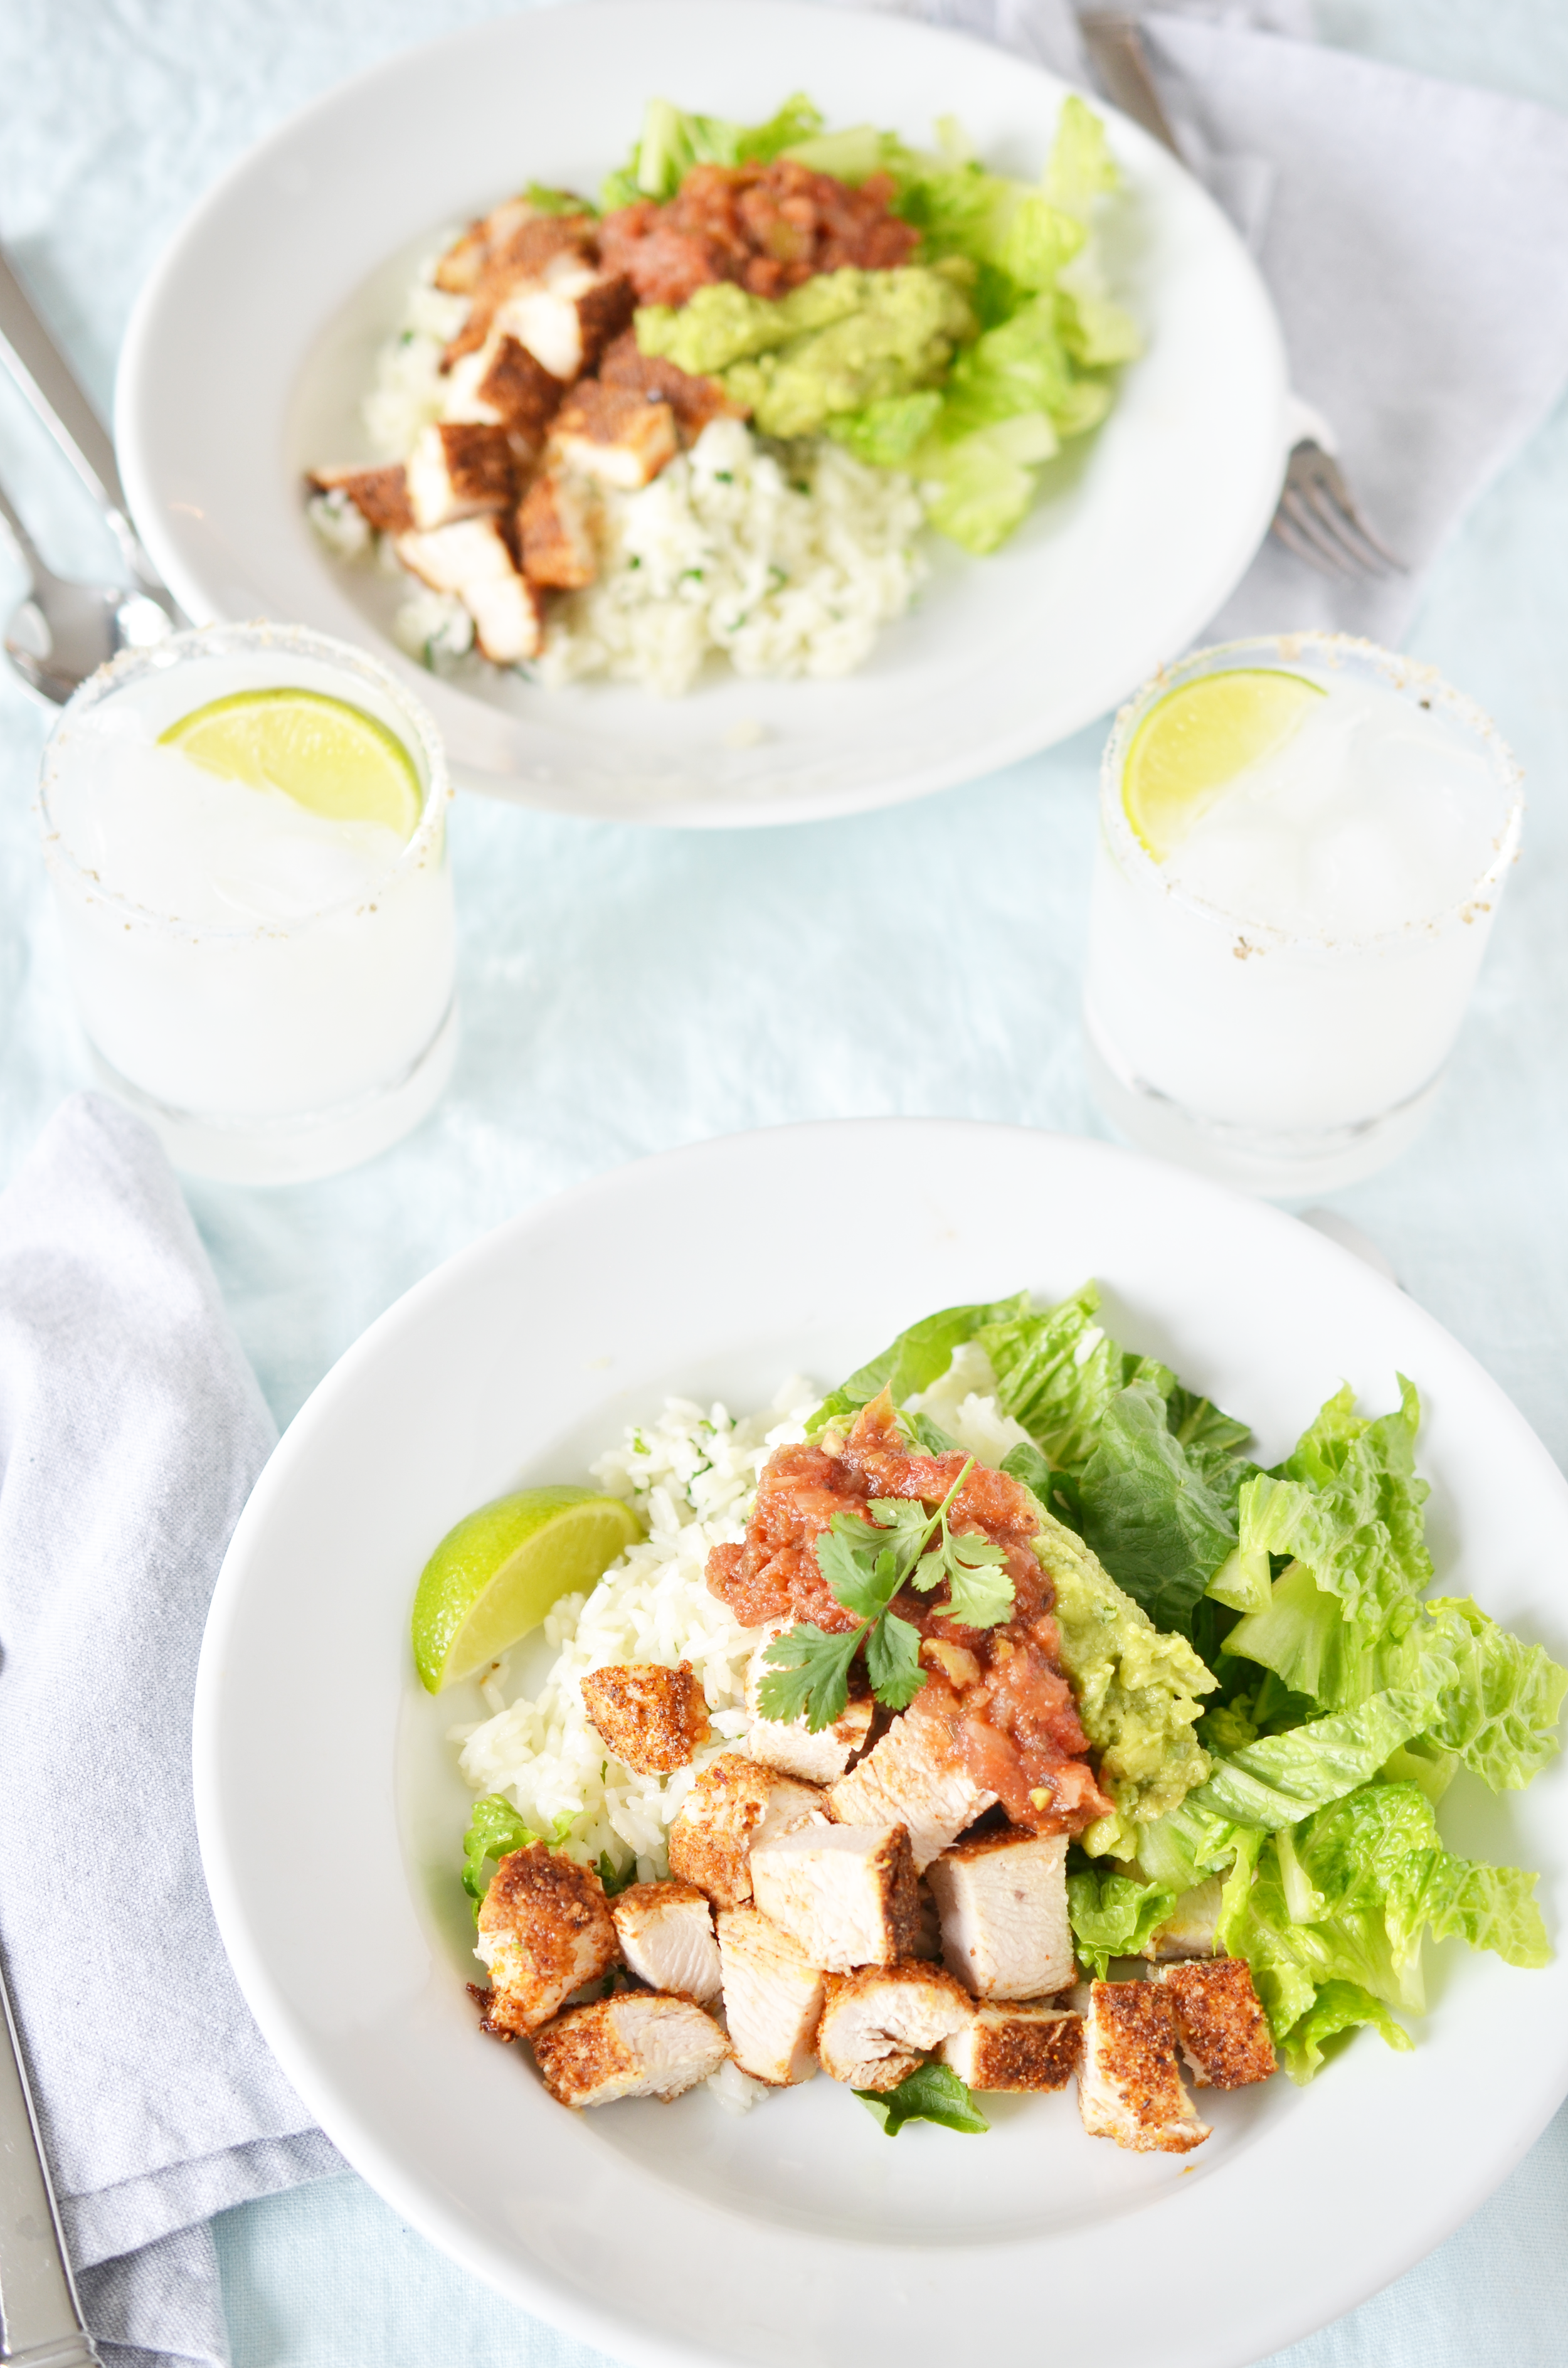
*UPDATED* Faux Chipotle Chicken Bowls
If there is one dinner that my kids adore, it’s getting dinner at Chipotle. They ask for it regularly - one literally begs for it. So I started figuring out what they liked best about it and went to work.
Here’s what I learned:
They love the rice. And it’s easy. Just add cilantro and lime to long grain rice.
They love the seasoned chicken. There are a thousand ways to season it and some are simpler than others. If you use a high quality taco seasoning, you can toss it with that and a little oil.
They love being able to top their own bowls with their own bits. Lettuce, cheese, guacamole, salsa, you choose! Throw chips on the side and you’re really winning.
I usually use chicken thighs when I make this because it’s the most flavorful. If you use thighs, then it’s best to grill them. If you have a flat top grill, then you’ll completely replicate Chipotle! I have a standard grill, which I might actually like better because you get those little crispy corners on the chicken which are delicious!!

I love using regular taco seasoning - I use one I make myself so I know what’s in it. But yours won’t turn out just like mine unless we’re using the same seasoning. There are fancy ways to replicate the seasoning with lots of ingredients and an overnight marinade. But I found a short cut that we will all agree is perfect and delicious and so so simple.
For the rice, DO NOT RINSE the long grain rice. Also, don’t skip the oil step. It’s critical in making the rice not stick together. Then when you stir, use a fork only. That will loosen the grains and not make them stick together. It’s a way to ‘fluff’ the rice while adding in the seasoning.


Faux Chipotle Chicken Bowls
serves 4
2 pounds chicken - breast or thighs
1/2 cup olive oil
1 tablespoon lime juice
1 teaspoon cumin
2 tablespoons chili powder
1 teaspoon oregano
2 teaspoons salt
1/2 teaspoon fresh ground black pepper
*
1 cup long grain rice
2 tablespoons olive oil
1/2 lime. zested and juiced
3 tablespoons cilantro, chopped
*
cheddar cheese shreds
salsa
guacamole
lettuce
beans
STEP 1
Preheat oven to 400 degrees.
In a large bowl, mix together 1/2 cup olive oil, lime juice, cumin, chili powder, oregano, salt and pepper. set aside.
STEP 2
Pat the chicken dry. If you’re using the breasts, pound it out slightly so there isn’t a “thick” part of the chicken, but it’s all mostly the same thickness. Toss the chicken into the bowl with the marinade and let it rest for a few minutes.
STEP 3
Heat 2 tablespoons oil in a large dutch oven and add rice. Stir to coat completely. Add two cups of water and bring to a boil. Let rice boil until most of the water has been absorbed. Reduce heat to low, cover and cook about 20 minutes.
STEP 4
GRILL: Heat your grill to 400 degrees. Sear the chicken on each side then reduce the heat to 300 degrees. Make sure your grill comes down. The chicken needs to cook through completely and that takes a few minutes. If you’re using the thighs, you want them to render off the fat. It takes about 20 minutes to properly cook the thighs. For the chicken breasts, it will take a little less time, but use a meat thermometer to make sure they are cooked at the thickest part. Let the chicken rest about 10 minutes when it comes of the grill.
STOVE: Heat remaining oil in an oven proof skillet. Sear chicken on both sides until it’s brown and crispy on the edges. Pop the skillet into the oven and cook another 10 minutes (or so) until the chicken is cooked through. I use a meat thermometer and make sure I’m close to 150 degrees. Remove the pan from the oven and let the chicken rest in the pan for another 10 minutes.
STEP 5
Fluff the rice with a fork and stir in the lime zest, lime juice, and cilantro. Chop the chicken into bite sized pieces.
STEP 6
I like to serve everything like a buffet and let my kids choose what they want to put on their bowl. The options are limitless!


Let’s have a Margarita
How about a cocktail on the side? These are the best margaritas you can make - and super simple.
Clambake for a Crowd

A clambake is possibly my favorite meal ever! It’s impossibly simple, serves a crowd, and it looks so impressive. We serve it every year at our beach house for the Fourth of July. It’s always a hit (with the exception of one year when some people showed up with another guest and then told us they didn’t like shellfish - so they sat on the side and watched us eat - awkwardly).
I usually make this for a crowd. It’s a really simple way to feed a crowd. But it’s also a really fun weeknight dinner for the family! In the summer it’s a fun way to make a regular weeknight dinner seem a little more fun. Also, you don’t actually need plates.
When we make clambake for the crowd, we usually just roll out freezer paper on the table. When the clams have opened up, then we just pour it out on the table (after draining of course!) Add a few bowls of melted butter and you don’ need any other dishes! Or you can use dishes and be more civilized. Your call.


Clambake
Serves 4-6
2 cups water
1-12 ounce pale ale
2 pounds fingerling potatoes
1 pound kielbasa, cut into two inch lengths
2 lemons, cut into rounds
14 ounce bag frozen pearl onions
4 ears of corn
6 cloves garlic
2 pounds clams
2 pounds mussels
2 tsp Old Bay Seasoning
¼ cup butter, melted
1 loaf crusty bread
STEP 1
In a large pot bring to a boil beer and water with kielbasa and potatoes.
STEP 2
Once it’s boiling, add corn, onions, one of the sliced up lemons and garlic. Cover and cook for five minutes.
STEP 3
Add clams and mussels to the top. Sprinkle Old Bay seasoning over everything. Cover and cook until clams open up. About five minutes.
STEP 4
Drain off liquid then pour the pot out on a table or in a large bowl. Serve with butter on the side and a loaf of bread.

How to pull it off
1. Prepare all ingredients – cut the kielbasa, shuck the corn, etc.
2. Roll out freezer paper on the table and have paper towels, wipes, and extra napkins standing by
3. Make the clambake
4. While waiting for the clams to open up, melt the butter.
5. Pour out the clambake. Enjoy!