Swedish Meatballs | just like Ikea

For a while, Ikea meatballs were a regular in the freezer and a quick dinner on nights I couldn’t think of what else to do. It made such a simple dinner AND they sell little packets of gravy so it’s so stinking simple!

I haven’t talked about it a lot, but there are twelve allergies in my family. TWELVE. Some are normal (hazelnuts) and some are weird (yeast) but all make for weird cooking patterns. If you notice on this blog, I tend to cook dinners that are healthy, dairy free or dairy light, and filled with good ingredients. The reason is simple, we can’t eat out a lot.

Ikea meatballs contain yeast, a nutritional yeast that boosts the flavor - vegans use it all the time to replace cheese - it’s totally normal, unless you have an allergy. So we had to scrap the freezer full of meatballs and if we wanted them, I need to make them myself.

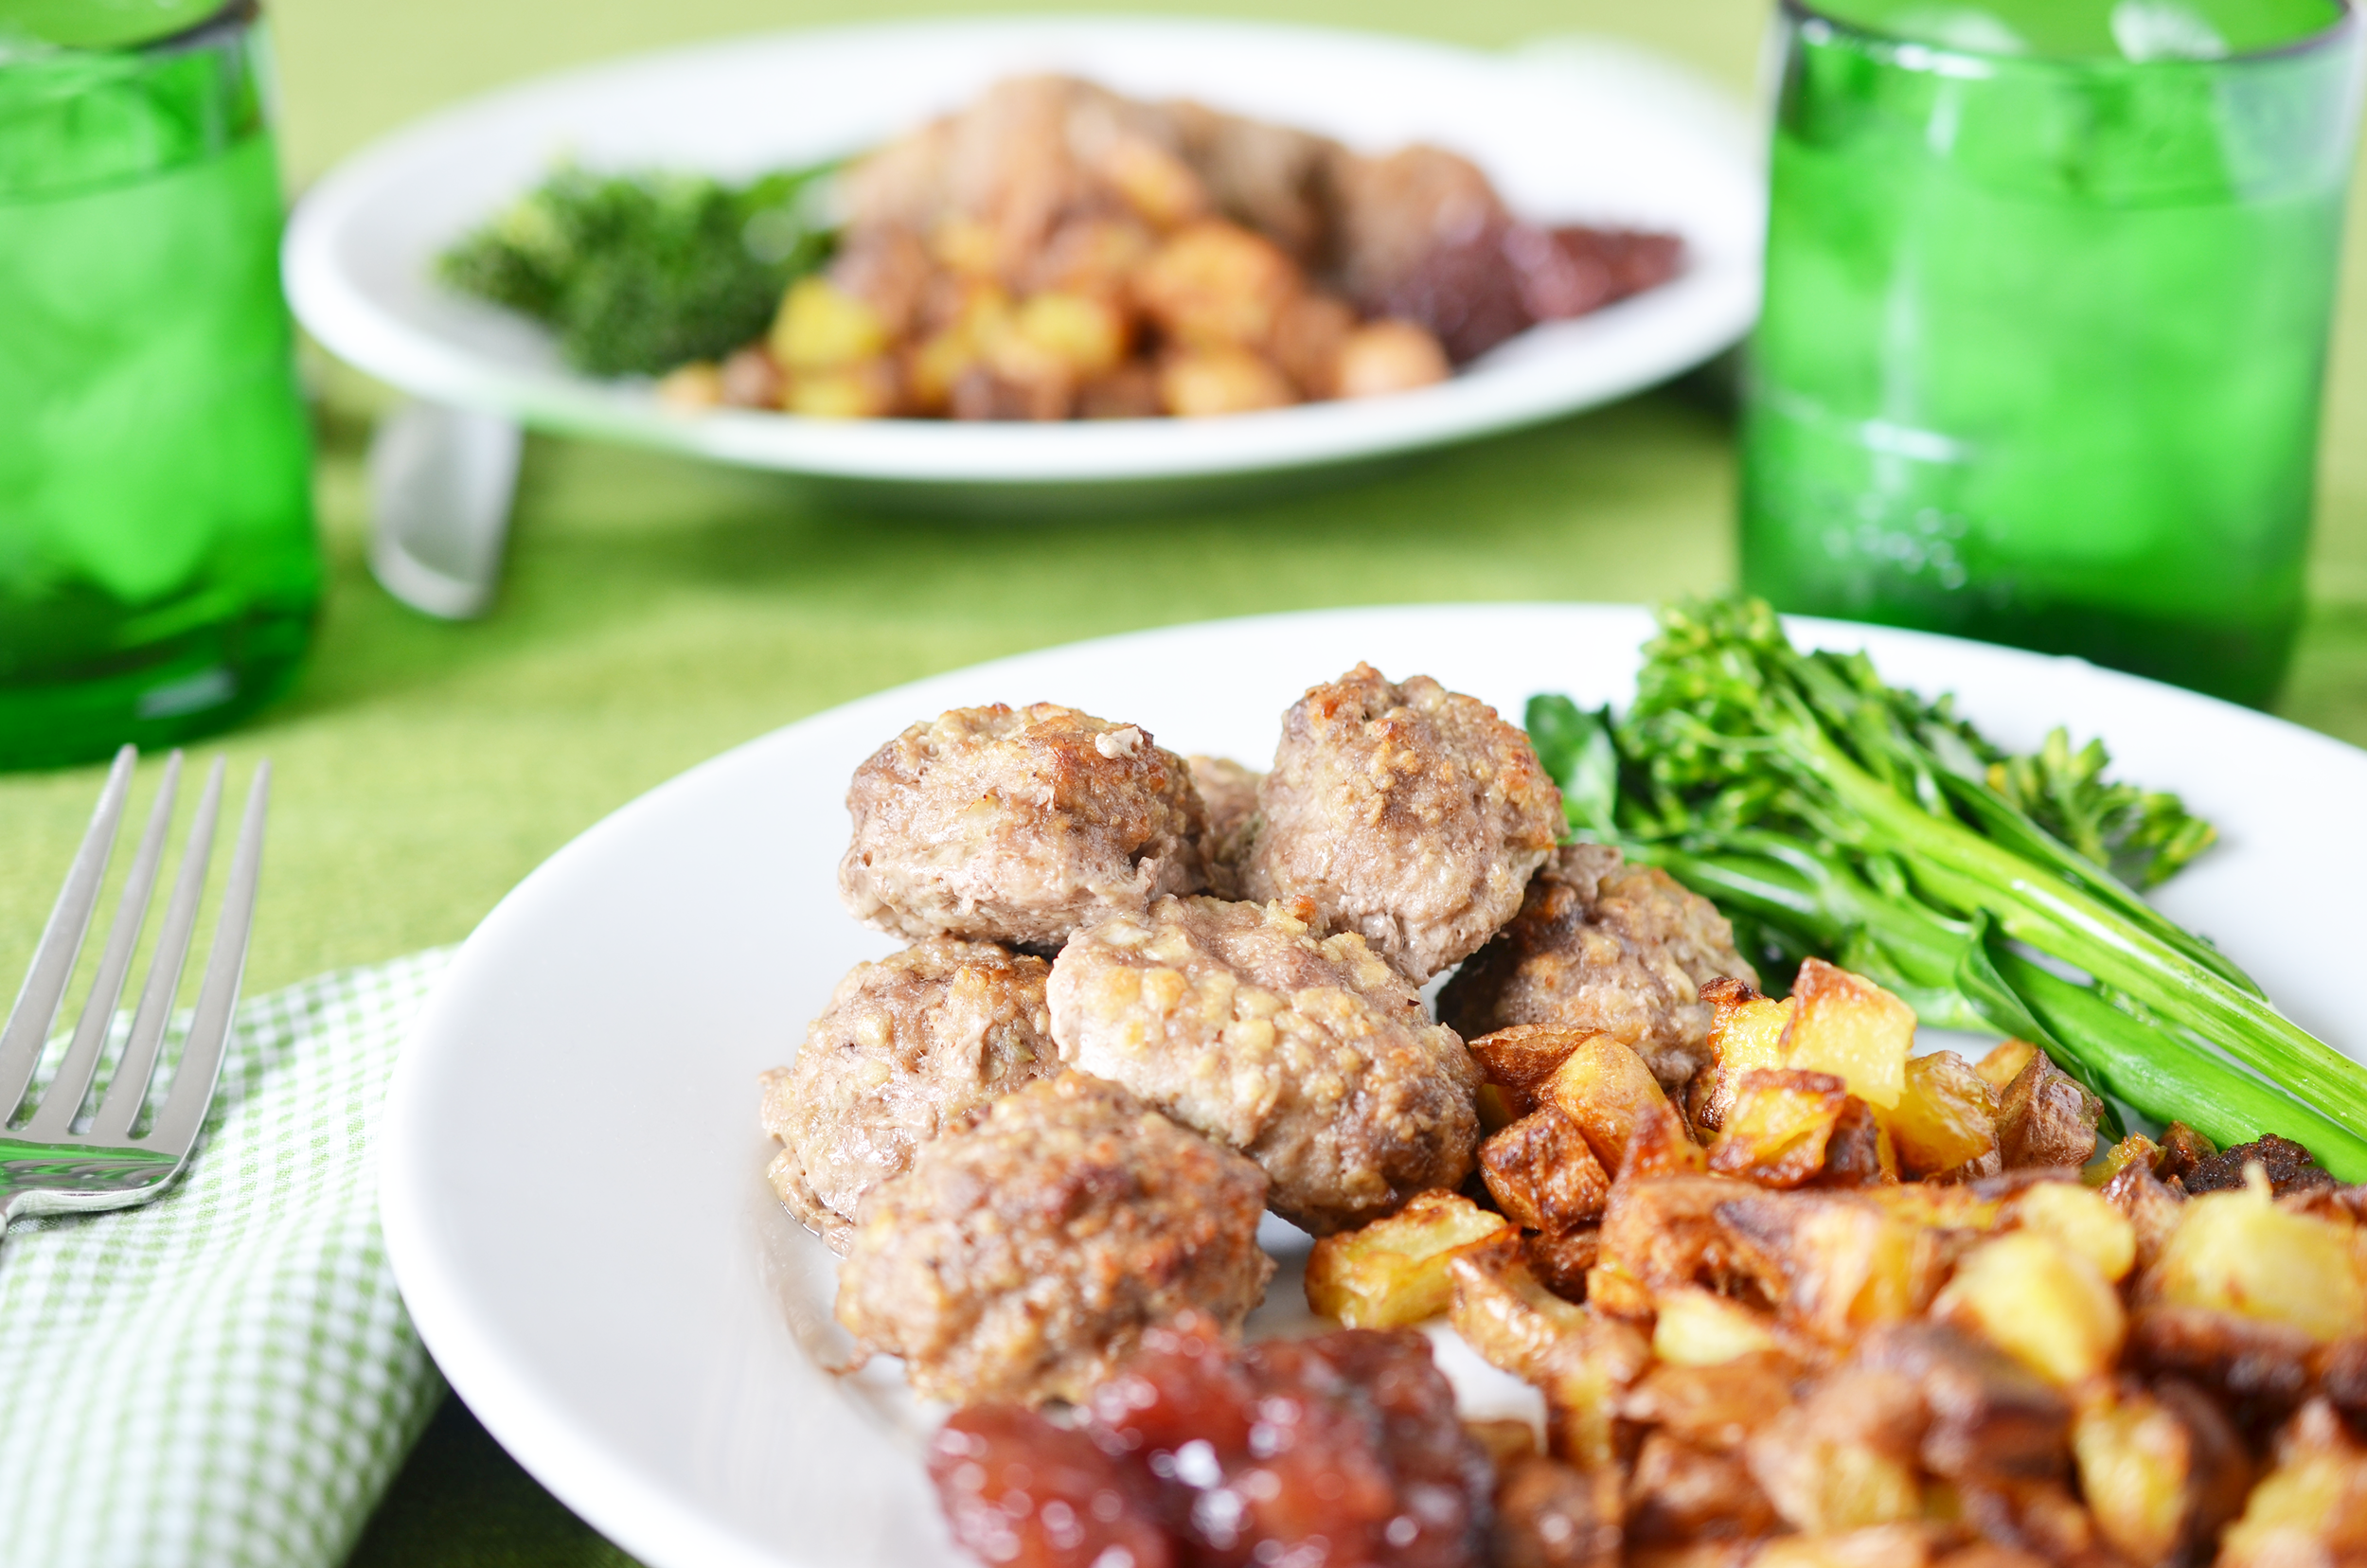
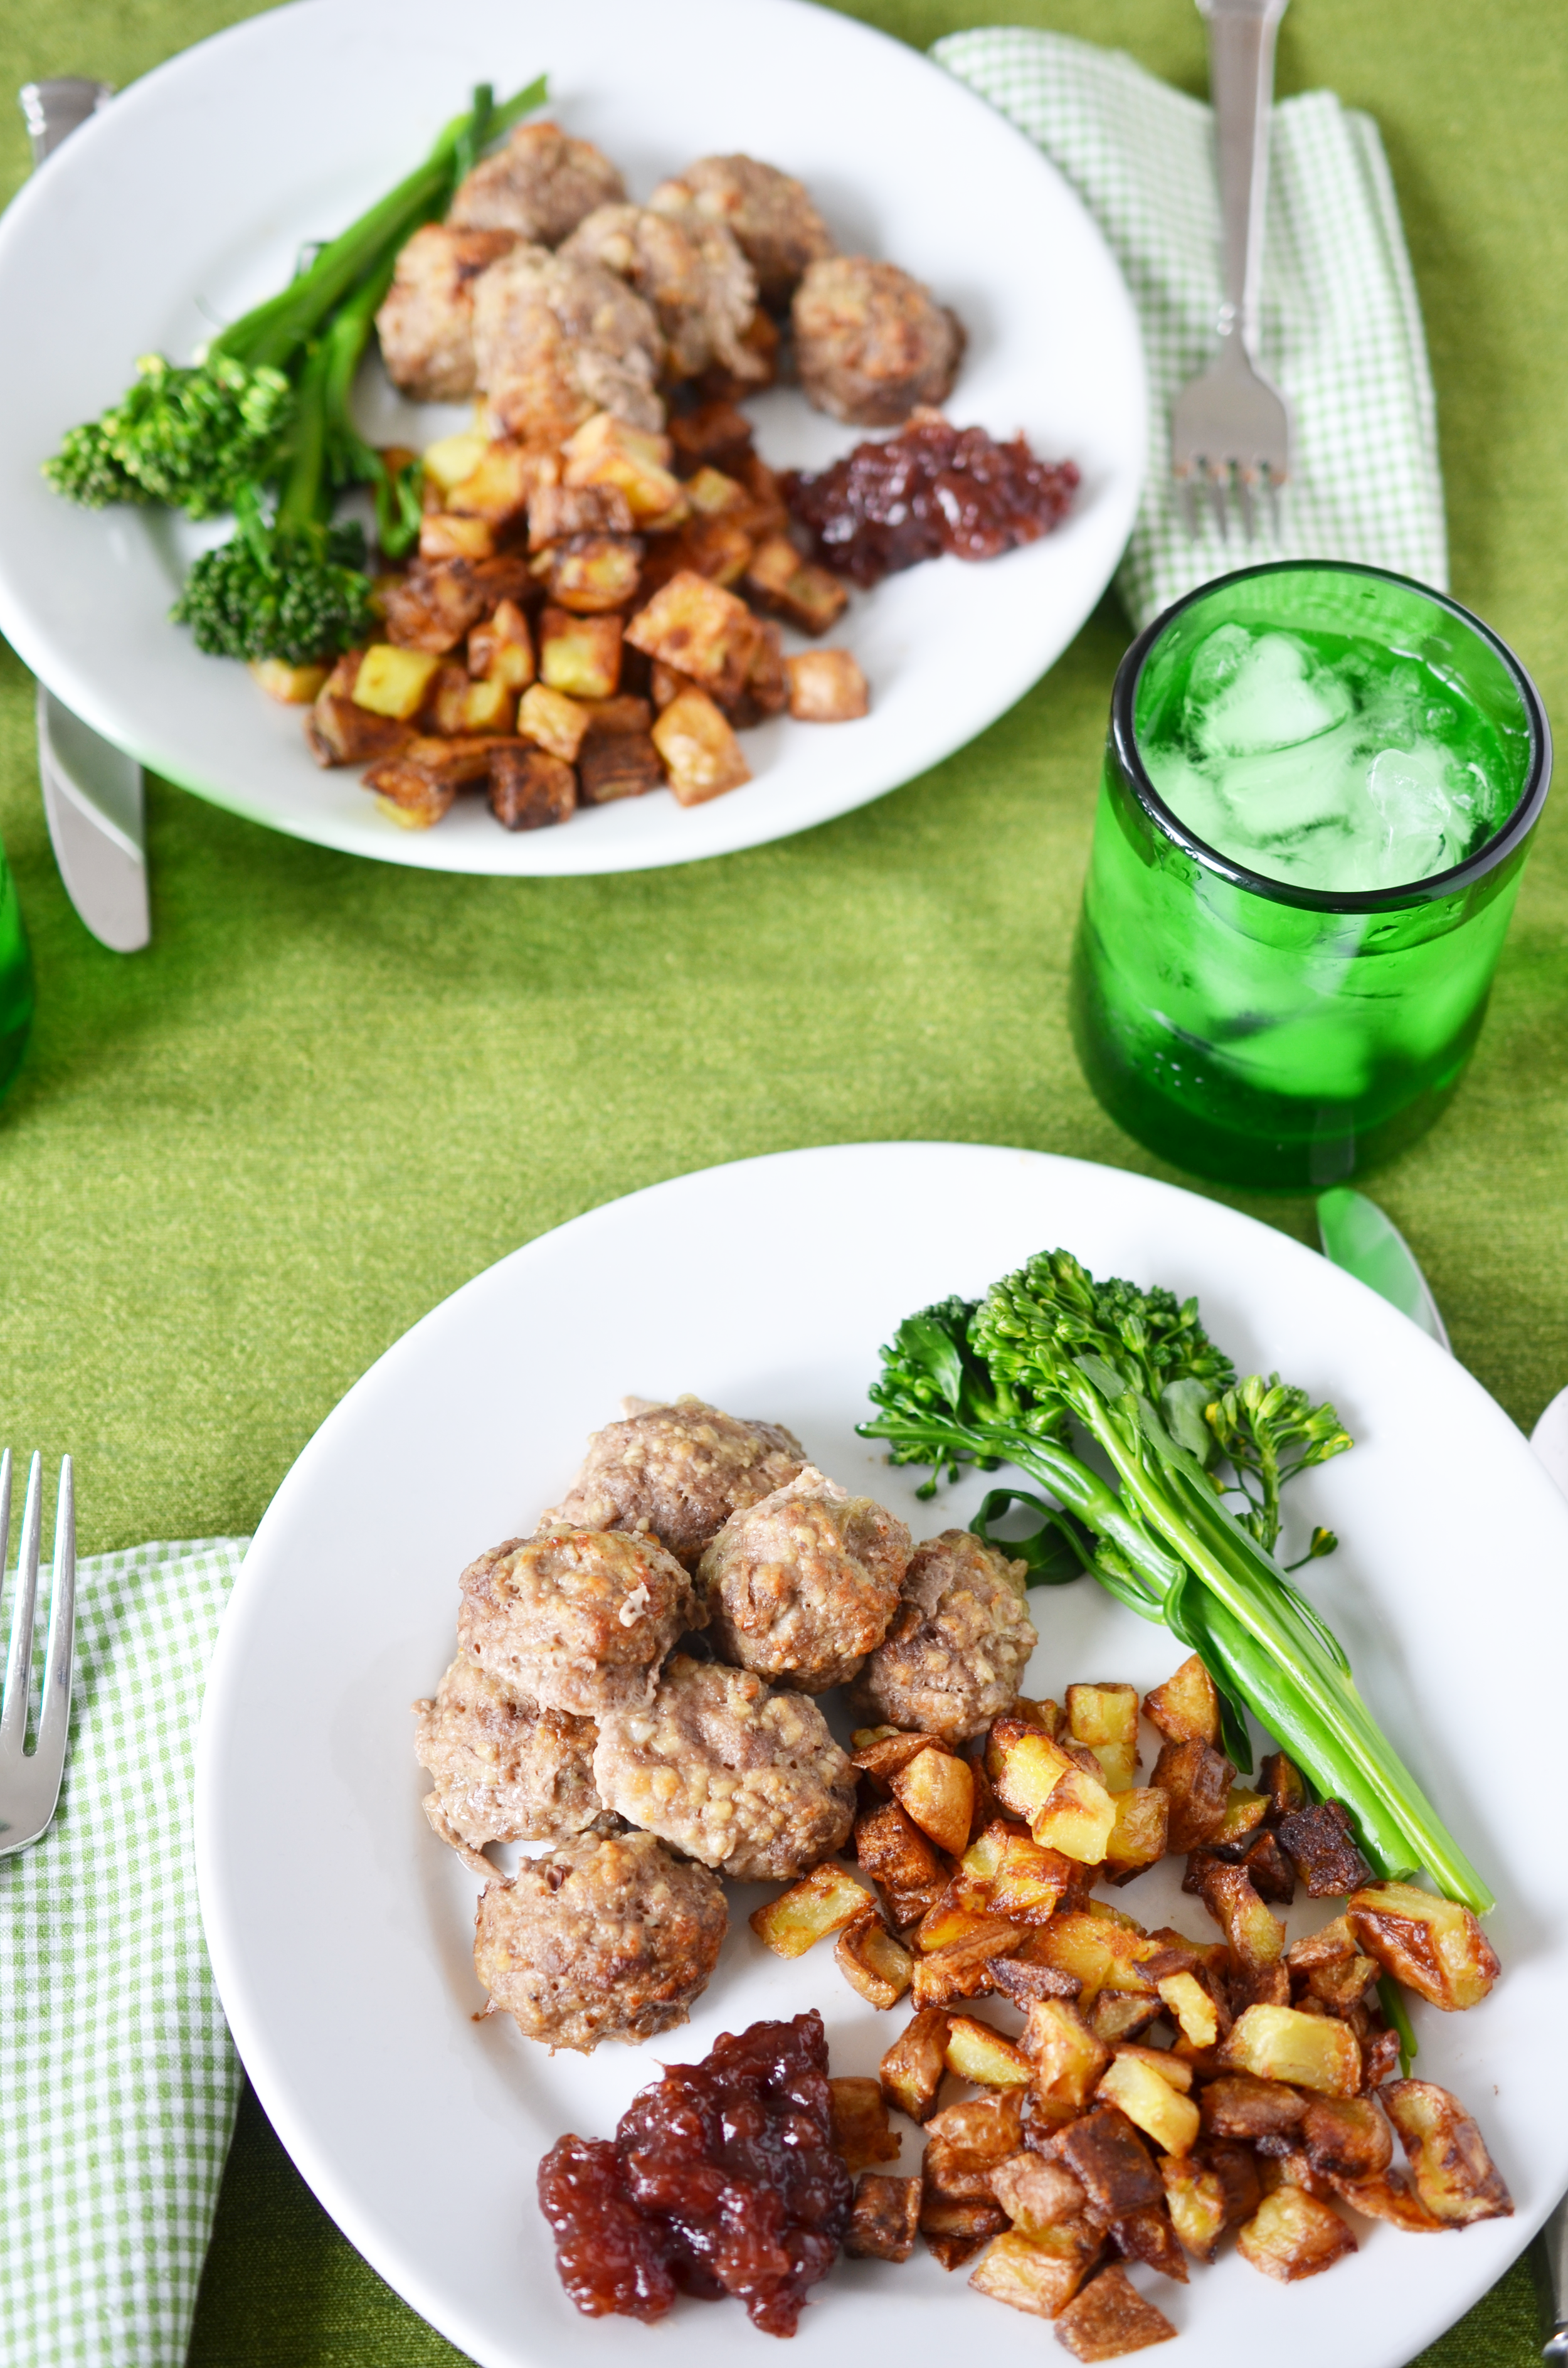
Obviously, I’m cool with that. I love the challenge of making things myself. So here they are! My hot tip for them is to bake until they get a little crispy on the edges. I love that little crunch and I know you will too!

If you throw a pan of little chopped potatoes into the oven at the same time, then you have a dinner on the table in literally half an hour. I’ve done mashed potatoes too - but really the key is any kind of a potato. Oh, and the lingonberries. You can’t skip the lingonberries - buy a jar at Ikea and keep it on the shelf.

Swedish Meatballs

serves 4


1 pound ground pork

1 pound ground beef

1 cup panko breadcrumbs

1/2 onion, grated

1 clove garlic

1 egg, beaten

1/4 teaspoon allspice

1/4 teaspoon nutmeg

1 teaspoon oregano

1 cup water

salt & pepper


STEP 1

Preheat oven to 425 degrees.

In a mixing bowl combine all of the ingredients and stir to combine. I use my hands because that’s easier, but some people are grossed out by that.


STEP 2

Form the meat into balls. I use a scoop to get the right size, then make them look nicer with my hands. If your hands are damp, the meat won’t stick to you.


STEP 3

Pop the meatballs in the oven and bake 15-20 minutes until cooked through. Serve with potatoes, lingonberries, and a vegetable.


Thom Collins

A refreshing cocktail on the side is perfect! If you add a 1/2 shot of Elderflower liquor, it becomes a little bit Scandinavian.

Hurricane Cocktail

Does anything scream “New Orleans” more than a hurricane cocktail? They are a classic - invented in the 1940’s. There are several stories. My favorite is that the cocktail began at a speakeasy in New Orleans. The year was 1941. The code to get into the speakeasy was “Storm’s a brewin’” - which clearly led to the thematically appropriately named drink. Whether the glass that’s shaped like a hurricane lamp actually inspired the name of the drink OR was chosen to compliment the name, I prefer to think that someone with impeccable thematic skills made it all happen.

Mr Hedin and I had a classic hurricane at Pat O’Brien’s when we were in New Orleans last year. It was good. It wasn’t “the best thing ever” but it was good. Part of what turns me off is when a cocktail is preprepared and poured out of a jug. Not a fan. I like a drink made to order. I always think it tastes better.

I started researching how to make this drink. There are literally one zillion recipes. Every one of them had a different combination of ingredients, totally different rums, and none could agree on lemon vs. lime.

So I started mixing. And it was hard work. I landed on a recipe that feels like what we had at Pat O’Brien’s but made with real ingredients at home. I also simplified the rum situation. My favorite tiki bar, Smuggler’s Cove, did all the work on finding the perfect rum options for this cocktail - you can use one! Hooray! It’s annoying to have a pantry full of booze that only works for one recipe.

Classic Hurricane Cocktail

makes two drinks


2 ounces passion fruit syrup (see below)

4 ounces black blended rum (I use Blackwell Black Gold)

the juice of one lime


STEP 1

In a sauce pan, pour one cup passion fruit juice and reduce to 1/4 cup. Simmer it on low and just let it cook down. Remove from heat and let cool.


STEP 2

Pour the passion fruit syrup, rum and lime juice over ice in a cocktail shaker and shake it up well.


STEP 3

Pour all contents into a cocktail glass and garnish with a wedge of lime and a cherry! Sip slow.


Butter Pecan Cookies

When I was a kid I hated butter pecan ice cream. It was my dad’s favorite but I found it unsettling that there were crunchy nuts hidden in the smooth ice cream. It was disorienting. But, because it was my dad’s favorite, it was always in the freezer - and it was often the only thing left. So I ate a lot of butter pecan ice cream.

Eventually, I started to really like it. I love pecans, the butter flavoring is unbeatable, and when I had one with some caramel crumbles with it - I was convinced, it was a worthwhile flavor after all.

As with most flavors I love, I decided to turn it into a cookie. A rich cookie full of butter flavor and crispy pecans, and - the best part - a praline crumble.

The secret is the make the praline first with finely chopped pecans. Then stir it in to the cookie at the last minute when you add the chopped pecans. The two different kinds of pecans is how you take these cookies from good to epic.

You can substitute walnuts for pecans if needed. My aunt had a bakery for a million years and the secret to her pecan rolls were walnuts. Pecan pie = walnuts. Walnuts have a very similar flavor but in the Pacific Northwest, they are loads cheaper than pecans. Since pecans are my favorite nut, I always have a bag in the freezer - but it’s great to know you can make the swap if you need to!

Butter Pecan Cookies

1 cup butter, room temperature

1 cup sugar

2 egg yolks

1 teaspoon vanilla

2 cups flour

1/2 cup pecans, roughly chopped

1/2 cup praline crumbles (recipe below)


STEP 1

Preheat the oven to 350 degrees.

In the bowl of a stand mixer, combine together the butter and sugar. Blend until creamy.


STEP 2

Add in the egg yolks and vanilla. Blend until combined, scraping down the sides. Stir in the flour until combined.


STEP 3

Stir in the pecans and praline crumbles but don’t over mix the batter.


STEP 4

Scoop the batter and bake 12-15 minutes until browned on the edges. Remove and let cool before moving to a cooling rack. Store in an airtight container for one week.


Pecan Praline Crumble

1/2 cup brown sugar

1/2 cup sugar

1/4 cup evaporated milk

2 tablespoons butter

1 teaspoon brandy

1/2 cup chopped pecans


STEP 1

Line a baking sheet with parchment paper or a silpat. Set aside.

To make the pralines, heat the sugars, evaporated milk and butter to a boil over medium heat. Using a candy thermometer - get everything up to 235 degrees or the soft ball stage. The best trick is to stir until it starts to boil, then stop stirring and let it go.


STEP 2

As soon as it comes to temperature, stir in the brandy and the pecans. Keep stirring. Stir for one minute until the mixture begins to thicken.


STEP 3

Pour out the mixture onto the prepared baking sheet and let cool. Once completely cooled, chop into tiny pieces.


Korean Steak Wraps with 'quickles'

Korean food is my comfort food. I adore it. It’s what I choose for my birthday almost every year. I can’t stop. Won’t stop. Pop kimchi on it and I’m in heaven. I make a version of this with ground beef, but I realized a few days ago - mostly because I had some steak hanging around - that this would be delicious with thin sliced thin. So here we go!

It’s so fast. It’s perfect for a weeknight dinner when you’re running from one practice/game/tryout to the next. It’s also on the healthier side of things - steak, vegetables, kimchi for probiotics….

The best dinners are also ones that can make a good late plate. This makes a great late plate. I make a giant plate for the late arrivals and let them heat up the rice and meat and leave everything else on the side.

Korean Steak Wraps

serves 4

1 cucumber

1/2 cup white vinegar

1/2 cup rice vinegar

2 tablespoons salt

2 tablespoons brown sugar

4 peppercorns, cracked

1 teaspoon red pepper flakes

1 pear, grated

1/4 cup soy sauce

1 tablespoon brown sugar

2 tablespoons gochuchang

2 cloves garlic, grated

1 teaspoon grated ginger

2 tablespoons sesame seeds

2 pounds hanger steak, thinly sliced

butter lettuce

kimchi for serving

rice

STEP 1

In a small skillet bring to a low boil the white vinegar, rice vinegar, salt, brown sugar, peppercorns and red pepper flakes. To ‘crack’ the peppercorns you can use a mortar and pestle or smash them with the back of a knife. No peppercorns? Use fresh ground pepper - about 1/2 teaspoon or less.


STEP 2

Slice the cucumbers into large chunks then smash them with the side of a knife to break them apart. Pop them into a bowl or a pint jar. Once the vinegar mixture has come to a low boil (just a few bubbles on the sides and the sugar is melted) pour it over the cucumbers. Let rest until it’s time to eat.

STEP 3

In a large bowl, combine the pear, soy sauce, brown sugar, gochuchang, garlic, ginger, and sesame seeds. Add the sliced steak and let it marinade for 20 minutes or as long as an hour.

STEP 4

In a large wok or giant skillet, cook the steak quickly. Use the highest heat you can to get a good crisp on the sides and cook it fast. As soon as it’s cooked through, remove from the heat and serve!

STEP 5

Serve with rice, kimchi, and ‘quickles’ over cups of butter lettuce. Eat it up like a taco.


How about a cocktail to go along with it?

A little mandarin flavor turns this into something a little more special.

Breakfast Tots

My favorite food is tater tots. FAVORITE. Crispy, recently fried, and served with ranch is my usual order. Highly recommend if you haven’t tried. And tater tots are just a quick skip away from hash browns which is when I realized BREAKFAST TOTS!

Breakfast for dinner, football game snacks, actual breakfast, late night snacks.

I like these to be simple with just the basics. But what do you like with your breakfast scramble? Onions? Add them! Green bell pepper? Add it! You do you - but simple is pretty epic.

Breakfast Tater Tots perfect for game day!  by Ali Hedin

Breakfast Tots

1 package tater tots

6 strips of bacon

4 eggs, scrambled

1 cup shredded cheddar cheese

hot sauce

STEP 1

Preheat the oven to 450 degrees.

Place bacon in a cold skillet and begin cooking over low until crispy.

STEP 2

Pour out tater tots on a baking sheet in one even layer. Don’t over crowd the pan! Use two if you need to! Pop into the oven and bake about 20 minutes until crispy. If they aren’t crispy on the edges, don’t pull them out.

STEP 3

Scramble those eggs!

STEP 4

Pour out the crispy tots on a plate and top with half of the cheese. Top with scrambled eggs and crumble up the bacon. Top with remaining cheese.

STEP 5

Turn on the broiler and pop the tots in - it only takes two minutes to get the cheese crispy on top. Pull out from the oven (carefully! the plate is hot) and serve with hot sauce.


Espresso Martini

I love these - but only if it’s decaf. Some of us are just too old for caffeine + booze in the same moment.

Salted Brown Butter Chocolate Chips Cookies (aka Hooper's Dupers)

There is a bakery in Rossland, Canada that makes the most epic cookies ever. They are made with browned butter and dusted with flaked salt across the top. If that wasn’t enough - this bakery dots the top of each cookie with the chocolate ‘chips’ that are in the cookie.

It’s ridiculous how good they are. After eating more than my share of them, and going back to buy more, I decided I should figure out the recipe. So I figured out the recipe. The hardest part was finding the chocolate chips that were the right shape. They need to be flat and round - not like the ‘drops’ that you can usually find.

The bakery also uses dark chocolate. I could not find dark chocolate in these ‘chips’ but I am constantly on the hunt and I will find them one day and turn them into these cookies and we will all eat them in one sitting.

When you’re making the cookies, the tricks are:

  • Browned butter is not a job to do when you’re in a hurry. It’s a fine line between brown butter and burned butter. Also, you should do it on low heat which means it takes FOREVER.

  • Salt the cookies as soon as they come out of the oven and dot them with the extra chocolate. Both things need to melt into the cookie and cool together to make it work.

  • This batter gets weird as it cools down. I recommend baking them off quickly. I have two ovens here, but you can also put two cookie sheets into the oven as long as they are both in the center of the oven.

Salted Brown Butter Chocolate Chip Cookies

“Hooper’s Dupers”

makes two dozen


1 cup butter

1 cup sugar

1 cup brown sugar

2 eggs

1 teaspoon vanilla

2 1/2 cups flour

1 teaspoon baking powder

1 1/2 cup chocolate pieces

salt flakes


STEP 1

Preheat oven to 350 degrees.

In a saucepan, melt the butter over medium heat and continue to cook, whisking, until the butter turns brown and begins to separate into solids. Catch it before it gets too dark. I like it to be about the color of dark amber. Remove from heat and let cool slightly.


STEP 2

In the bowl of a stand mixer, combine together the butter with both sugars. Whisk in the egg and vanilla until light and fluffy.


STEP 3

Add the flour and baking powder. Blend until just barely combined then pour in one cup of the chocolate chips. Mix well.


STEP 4

Bake 10 minutes. When the cookies are done, immediately sprinkle the top of each one with flake salt. Top each cookie with two chocolate chips and let cool completely. Store in an airtight container for one week.


My famous chocolate chip cookies

The original, the OG, inspired by Ruth Wakefield’s original recipe. And if you don’t know who that is, you’re in luck! The post has the whole history of the cookie.

Miso Salmon Bowls with ‘quickles’

I made these for dinner last week and completely held my breath as I served them. Technically, my kids love salmon - they love pickles - they love rice - they love kimchi. But all together, with the miso, I just wasn’t sure. Turns out I had nothing to be worried about. They loved them. And asked to have them again soon. Especially the ‘quickles’ which I’m making again this week with a Korean beef dinner!

Miso Salmon Bowls by Ali Hedin | A quick and healthy weeknight dinner

‘Quickles’ are quick-pickles. When the vinegar mixture is hot, it’s poured over the cucumbers and - because they are smashed - they soak up the liquid and turn into a delicious version of a pickle. I don’t totally know what the story is with smashing the cucumbers. I saw it online and started reading about it. What I discovered (basically) is that smashing them opens up more ‘pores’ of the cucumber so it has better ability to soak up flavors. It’s suppose to be a great solution for salads, etc. where you want them to absorb dressing or - in this case - vinegar solution. It was worth a shot and I was impressed. I’ll totally smash them! Plus, the teenagers were intrigued and all came into try smashing. Family activity!

I did not include directions on making rice. I’m assuming you can make rice? Or you have a way you prefer? I make rice on the stove top. But my mom used a rice maker. My sister-in-law likes the bags of almost cooked rice. I honestly don’t care how you make it. I (obviously) think my way is right. But you do you.

Some miso paste is a little dry. Using the mortar and pestle ensures that everything gets mixed together. You don’t need to use it - just an option. A bowl and the back of a spoon works the same!

Miso Salmon Bowls by Ali Hedin | A quick and healthy weeknight dinner

Miso Salmon Bowls with ‘quickles’

serves 4


2 pounds salmon filets

2 tablespoons miso (brown or yellow)

2 tablespoons sesame oil

2 teaspoons mirin

2 teaspoons soy sauce

1 cucumber

1/2 cup white vinegar

1/2 cup rice vinegar

2 tablespoons salt

2 tablespoons brown sugar

4 peppercorns, cracked

1 teaspoon red pepper flakes

kimchi for serving

rice

edamame

pickled ginger


STEP 1

Preheat oven to 350 degrees.

In a small skillet bring to a low boil the white vinegar, rice vinegar, salt, brown sugar, peppercorns and red pepper flakes. To ‘crack’ the peppercorns you can use a mortar and pestle or smash them with the back of a knife. No peppercorns? Use fresh ground pepper - about 1/2 teaspoon or less.


STEP 2

Slice the cucumbers into large chunks then smash them with the side of a knife to break them apart. Pop them into a bowl or a pint jar. Once the vinegar mixture has come to a low boil (just a few bubbles on the sides and the sugar is melted) pour it over the cucumbers. Let rest until it’s time to eat.


STEP 3

Line a baking sheet with foil and pop the salmon on top of the foil. Pat it dry with a paper towel.

In a small bowl (I used a mortar and pestle) combine the miso, mirin, soy, and sesame oil. Blend until it’s a paste. Spread generously over the salmon. Pop into the oven and bake 10 minutes. Then turn up the heat and broil at 500 degrees for 5-10 minutes depending on the thickness of your salmon. To check, use a fork and pull back a small section - it should be flaky and the same color all the way through.


STEP 4

Serve the salmon over cooked rice with the ‘quickles’, edamame, pickled ginger, and kimchi.


Champagne Risotto with seared scallops

Some years for New Year’s Eve we go out to a big party, some years we host a big party, and some years we celebrate at home with our little family. This is the perfect dinner for that situation. It’s super elegant, but can be made in less than half an hour. The scallops are so tender and perfect this time of year - so they make a great addition. If you aren’t a seafood person, this is easily swapped into beef tenderloin, pork or even a chicken breast. But I stick by the scallops.

Champagne Risotto

with Chanterelles & Seared Scallops

Serves 4

1 shallot, chopped

1 clove garlic, chopped

½ cup butter, divided

¼ lb chanterelle mushrooms

2 tbs olive oil

2 cup Arborio rice

2 cup champagne

4 cups room temperature seafood stock

½ cup parmesan cheese

salt and pepper

8 large sea scallops

STEP 1

In a medium saucepan, heat 2 tbs butter & 2 tbs olive oil.  Cook mushrooms over medium heat until tender.  Remove from the pan and set aside. (5 mins)

STEP 2

In the same pan, melt another 2 tbs olive oil with 2 tbs butter.  Cook shallot and garlic until softened (4 mins)

STEP 3

Stir Arborio rice into the pan and stir until all of the kernels are coated in oil.

STEP 4

Pour in one cup of champagne and stir constantly to deglaze the bottom of the pan.  When most of the champagne has evaporated, add the second cup and stir until that liquid has evaporated.

STEP 5

Pour in one cup of stock and stir until completely incorporated.  When most of the stock has dissolved, add another cup of stock.  Continue until all of the stock has been added.  Season to taste with salt and pepper.

STEP 6

Remove from heat and stir in mushrooms, remaining butter and parmesan cheese.

STEP 7

Bring a dry skillet to high heat.  Pat the scallops dry and season with salt and pepper.  Melt 2 tbs butter in the pan and place the scallops into the melted butter.

Cook 1-2 minutes until browned.  Flip and cook 2 minutes on the other side.  Scallops are properly cooked when slightly firm to the touch.

NOTES

  • Weeknight Trick, use room temperature stock instead of anything chilled.  The warmer the stock when it goes in the pan, the better the absorption.

  • Use a decent champagne when making this – you’ll taste it!  Plus, you’ll have extra left over to drink with dinner.


The original Champagne Cocktail

The original champagne cocktail is mentioned in Casablanca, in Mark Twain’s Innocents Abroad, and has been turned into one million variations. This is the classic one. The OG.

It’s pretty simple - and it works - like most classic cocktails. It’s a little sweet (sugar) a little bitter (bitters) a little warm (cognac) and deliciously bubbly. The lemon on top is the perfect topper.

I found that if you swirl the cognac with the sugar before you add the champagne, it’s a better drink immediately. But it is not as impressive when you serve it. If you don’t swirl, the sugar cube bubbles with the champagne and it looks so pretty. But it takes a few minutes to get to the delicious drink you’re craving. Either way, you should totally make these for New Year’s Eve.

Ali Hedin makes the original champagne cocktail for New Year's Eve

The Original Champagne Cocktail

1 sugar cube

2 -3 dashes bitters

1/2 ounce cognac

Champagne

lemon

Drop a sugar cube in the bottom of a champagne flute. Drip the bitters onto the sugar cube and let it sit so it soaks up. Pour in the cognac and swirl a little (optional - it’s better for flavor, but not the looks). Then top with champagne, pouring slowly to not get too much foam.

Cut a lemon with a wedge knife or a vegetable peeler and squeeze it over the top so there’s just a hint of lemon oil. Serve immediately!

Ali Hedin makes the original champagne cocktail for New Year’s Eve

Chocolate Candy Cane Cookies

This time of year we are making so many cookies it’s unreal. Lars made a batch last night for his scout troop today- I made a batch today for friends - last week I think we went through 12 pounds of butter just making and frosting cookies.

These are ones you will want in heavy rotation. They are in heavy rotation at our house - this is literally what Lars made last night, they are a huge favorite in our house. Jud told me today that he waits all year for these! Who knew?

Ali Hedin's Chocolate Candy Cane Cookies - perfect for holiday parties!

Chocolate Candy Cane Cookies

1 cup butter, room temperature

1 cup brown sugar, packed

1 cup sugar

1 teaspoon vanilla

2 eggs

1/2 cup cocoa powder

2 cups flour

1 teaspoon baking powder

8 candy canes, crunched up

STEP 1

Preheat oven to 350 degrees. Line your baking sheet with parchment or a silpat. Crush up the candy canes until they are very small pieces and set aside.

STEP 2

In the bowl of a stand mixer, combine the butter and sugars until creamy. Add the eggs, vanilla and cocoa powder and blend until light and fluffy.

STEP 3

Blend in flour and baking powder until the dough comes together. Roll a scoop of dough and dip the top into the crushed candy canes. Place candy side up on a lined baking sheet. Bake 12-15 minutes. The cookies will seem cake-y. It’s ok. Let them rest on the pan for about five minutes before moving to a rack to cool completely.

Store in an airtight container for up to one week!